
Portable Object Oriented Language
Revision Level: see Revision Index
©
|
|
|
|
VDO-Straße 1 |
Büro For
Datentechnik GmbH |
Portable Object Oriented Language
Revision Level: see Revision Index
©
|
|
|
|
VDO-Straße 1 |
Büro For
Datentechnik GmbH |
3.1 Important instructions for working with the tutorial
3.2 The POOL programming language
4.1.5 Basic data types (simple types)
4.4.4 Parameter passing sequence
5 Advanced programming methods
5.1.3 Pointers to complex data types
5.1.6 Datatype pointers and double pointers
5.1.7 Dynamic memory management
5.1.8 Passing pointers to subroutines
5.1.9 Passing references to Subroutines
5.1.10 Recursively linked lists (single linked lists)
5.1.11 Single linked lists (non-recursive)
5.2.2 Compiler commands having parameters
|
Date |
Author |
Rev. |
Ref. |
Type |
Description |
|
2003-05-23 |
Harald Ebert |
0.90.20 |
div. |
cont. |
Revision of the English version |
|
2002-10-10 |
Uwe Kühn |
0.90.10 |
div. |
cont. auth. auth. |
Content was revised Text was edited Formatting, form templates |
|
2002-07-17 |
Thomas Locker |
0.90.00 |
- |
- |
Initial Revision |
Acronyms:
AIDA
Automotive and Industrial Diagnostic Assistance. System that is used to implement computer supported diagnosis of control modules and field bus systems.
BSK
Manufacturer of the AIDA system
OOP
Object oriented programming (see the appropriate chapter).
POOL
Portable Object Oriented Language. Object oriented programming language by BSK. Used for programming of the AIDA system.
SMK
Software Method Kit. Description of the programming guidelines by Siemens VDO.
This first part of the POOL tutorial addresses both programming beginners and experienced programmers switching from other programming languages. It treats the fundamentals of the POOL programming language.
The second part of the tutorial teaches object oriented programming and the implementation in POOL.
The third and final part deals with the POOL standard libraries. You can work with this part directly after finishing this part if needed. It is not absolutely necessary to study the second part first to work with the third part.
The standard libraries contain, among others, functions to work with strings and files, and mathematical functions.
Beginners will receive a compact introduction into the fundamentals of programming in POOL during this course. The focus of the tutorial is on easy to read and clearly arranged examples instead of difficult to read notations usually used to specify a programming language.
Beginners should first work and think through the introductory program. Please don't worry if you do not understand everything the first time. The individual topics will be treated in further detail later.
In the subsequent chapters we will give a step by step introduction into the individual areas of programming with POOL. An outlook is added to many of the chapters, in which you can find notes for advanced programmers. Beginners should use these outlooks only for overview purposes. Since it is not possible to learn to program by merely reading a book or tutorial, you should always work on the existing practice sections and do them yourself.
Please take the time to view the sample solutions and to read the explanations after you have successfully finished the tasks.
If a file with the .pool ending is displayed behind an "example“ or a "solution“, you can find the program code in the provided example files. They are located on the accompanying CD or disk in the folders "examples" or "solutions".
If you are unsure about the meaning of a word such as "Compiler“, you can look up the major terms concerning the programming topic in the annex. For anyone who has not previously dealt with programming, we can warmly recommend reading the introduction chapter.
SMK coding rules (Software Method Kit, Siemens VDO programming guidelines) and the POOL Reference Manual by BSK were considered during the creation of the program examples. They include, among others, regulations on formatting and allocation of names that have to be observed when creating software. In order to properly teach POOL, the regulations were consequently applied in all areas. Comments are used to help the beginner with reading the program code.
For users who switch from other programming languages the examples offer a great opportunity to quickly learn the syntax and the scope of functions of POOL and to apply them to other projects. The "Outlook“ chapter describes further details and features at the end of each section that are of particular importance for advanced developers. Not every possibility was shown in the examples down to the last detail in order not to overwhelm beginners. If you require additional details, please refer to the BSK help text. You can open the help text via the AIDA commander help functions.
The string data types and the various methods for string manipulation are special POOL features that are not found in C and other languages.
However, for those who have not previously worked with the AIDA commander, we highly recommend going through the example in the introduction.
There already are a lot of programming languages, why then create a new one, why create POOL?
There are two basic requirements in the AIDA system that don't really match. On the one hand a quite comfortable and powerful script language is needed to enter commands, which can at the same time be used to enter a string of commands. On the other hand it should be possible to combine the command strings into fixed modules and libraries with a reliable programming language quality. One of the basic requirements in order to keep the system simple is that there should not be two different types of languages that are used for control in the AIDA system. When searching for existing approaches that have the same goal it quickly becomes apparent that, up until now, there neither is a script language that meets serious and complex programming requirements, nor is there a programming language that is truly dialogue-capable.
The new programming language POOL includes the following desired and necessary features:
· POOL is easy to learn
Due to the very clear semantics and the strict syntax of Pascal, POOL was based on this language. Pascal itself had originally been planned as a teaching language as you might know.
· POOL is flexible
Despite the fact that POOL is based on Pascal, parts of many other programming languages were used and, true to the name, added to the "Pool" of possibilities.
· POOL is object-oriented
The language scope is based on the object-oriented language that was added to Pascal by Borland. Doing this is obvious, since it is of advantage to interpret the parameters and measured quantities, with which such a system is going to be concerned in the intended field of application, as objects with all the inherent properties and methods.
· POOL is portable
The entire POOL system, as well as the parser, the code generator and the code interpreter were written in ANSI-C, and as a result can be easily applied to other systems as a whole. Thus, there is also a Linux and a pocket PC version available in addition to the Windows version.
· POOL is independent from the system
POOL uses uniform data types on all machines. The code that is created by POOL is the code of a virtual machine and consequently it really can run on all platforms. Since there are no more object relationships on the virtual machine level, the code can even be executed on smallest computers such as intelligent interface boxes that have a small code interpreter. This represents an valuable advantage compared to similar approaches such as Java.
· POOL is open
C-function calls are used as interfaces to general function libraries and operating system calls. They enable the user to connect existing libraries to the AIDA system. Besides, they make it easier to issue system calls, since API calls are usually available as C calls.
· POOL is transparent
The code that is created by POOL contains debugging information that can be used for a genuine source code debugging.
· POOL code is protected
The code that is created by POOL is the code of a virtual machine, and thus it is as protected against reengineering as a compiled code.
· POOL is a highly efficient command language
It is also possible to create commands with more complex statements since POOL includes run time type information. This allows a highly flexible command syntax without loosing POOL's strict syntax rules checking.
"Hello World"
Before we will go into the details of the POOL programming language, we will start at this point, as usual, with the program "Hello World".
With the help of this example we will analyze the procedure of creating an executable POOL-program.
To do this, please proceed as follows:
· First, create a project folder for the tutorial.
· Next, start the editor. The TextPad program by Helios Software Solutions was used to create the program example. However, any other editor can be used. Editors with syntax highlighting are to be preferably used for POOL.
· Next, please enter the program lines that are listed below (or "copy & paste"). Important: POOL is case-sensitive; in other words, please observe uppercase and lowercase letters. The purpose of the comments is to explain the program structure.
· Save the file as "test.pool" in your project file.
Example (HelloWorld.pool)
{Comments in POOL are, as in Pascal, put into curved brackets}
{Every POOL program starts with the module name}
module HelloWorld;
{Declare public procedures before private areas}
procedure vHelloWorld;
private {non-public area}
procedure vHelloWorld;
begin
Writeln("Hello World"); {puts out "HelloWorld" in the Commander}
end;
procedure vMain;
begin
vHelloWorld; {open HelloWorld procedure}
end;
{vDeinit: de-initialize module}
{-------------------------------}
procedure vDeinit;
begin
{Here is the place where
a deinitialisation
could be done}
end;
{initializer module}
{--------------------}
begin
{Here is the place where
a special initialisation could be
done for the module}
end.
The program is already more complex than it would have had to be. The "Writeln" could have also been located in the Init routine. However, we already wanted to point to the special POOL features that exist for the processing of programs.
The design of POOL programs is as follows:
· The Init routine is located at the end of the module and is characterized by the key words begin and end. Each POOL program first runs through this procedure and thus this procedure has to exist.
· Then the compiler searches for a procedure named "vMain" and executes it also, if it was able to find it.
· Once the program is finished, it searches for a procedure named "vDeinit". If such a procedure exists, it is executed before the module is closed.
Don't worry if you did not understand everything the first time. We will go into the details of each individual item later on. However, you should already try to visualize the fundamental structure of a POOL program at this point of time.
If you are uncertain about some terms, we recommend again that you please refer to the explanation of terms in the annex.
Compiling the program
Before the program can be executed in the AIDA Commander, it first has to be compiled. To do this, the text file (.pool) is converted into the interim code of the virtual machine (.pi). This code can then be executed by the P-code Interpreter (PI.exe).
The following example for the call of the compiler is done via MSDOS input request. By entering POOL -? you will receive a list of the command syntax of the compiler and the compiler options.

Figure 1: The compiler commands
In order to compile you first have to change the path to the POOL file. Next, start the compilation process by opening the compiler and transferring the file that is to be compiled. The syntax to do this is:
POOL test.pool
If the compilation was successful, you will receive an executable file with the file extension .pi. If the program is incorrect, a short message is displayed. The treatment of errors and a folder for the compiled file can be specified with the help of compiler options. The compilation of the file with the following options will produce well formatted error messages:
POOL –q –m –f test.pool
Try testing the various formatting of the error message by adding an error into "Hello World" and compiling it with and without the compiler options. Please see the above figure for a detailed description of the available compilation options.
Include "Hello World" in the Commander
After the module was compiled it can be executed in the AIDA commander. To do this, the menu bar has to be edited. It is useful to create a separate main menu right from the start. The following steps are required for the execution of a POOL program:
· Start the AIDA Commander.
· Right click on the desktop and turn on the edit mode.
· Click "Menu" in the toolbar window.
· Select the "New Column" (Neue Spalte) button in the menu window, name the column, and confirm with "OK".
· Click on the "Analog Stop Watch" (Analogstoppuhr) field in the "Demo" column, and press the "Copy" button at the bottom.
· Now mark a line in the separate column and press the "Enter" (Einfügen) button.
· With the above steps you have created the basic structure. Next, press the "Edit" (Editieren) button and adjust the entries accordingly (the menu text as well as the command). The path specification is located after pi.exe, separated by a comma and the program name is listed in quotation marks. The specification of the program path is marked in blue in the following figure. As an alternative, the system variable can also be used to specify the program path.

Figure 2: Program Path Specification
· Close all edit windows and try it by starting the new menu item.
If everything went well, the text "Hello World" should appear in the input/output window. The program is processed exactly once after it was started and then closed. During the process, the program executes the Init, vMain and vDeinit routines that are described above one after the other. The same procedure applies to additional practice programs.
Note
When executing short program sections there is also a possibility of directly entering them into the input and output block of the AIDA Commander. Please test the direct entry with the following command line
Writeln("HelloWorld");
and then press the enter key. If it was executed correctly, "HelloWorld" is written in the output area.
The debugger is an important tool for finding errors in larger programs. With the debugger it is possible to execute and monitor a program step by step. It is not absolutely necessary to use it in the first practice programs of this tutorial, however it certainly makes sense to familiarize yourself with the options of this tool right from the start.
The following introduction is intended to provide a brief outlook, to which you can refer anytime if needed.
The analog stop watch example can be opened in order to experiment with the program.
Please observe during the debugging procedure that the debugger of the AIDA commander only monitors variables and functions that were previously defined as public. The purpose of this is to provide the developer with an opportunity to control which piece of information will become public. However, it is mainly a boundary condition that is to be observed, if you program an application in POOL that is to be debugged later on.
In order to debug your own application, please proceed as follows:
· Start your own application in the AIDA commander.
·
![]() Start the browser for POOL using this button.
Start the browser for POOL using this button.
Now all open IDE modules are visible.
· Double-click on your own module name. You will now find a list of the program parts that are defined as public, as well as an entry named "Source Files".
· If you track this entry, an edit window will open after the final file was selected. At its upper end you will see the control buttons of the debugger. They are self-explanatory since they indicate their function via "mouse over".
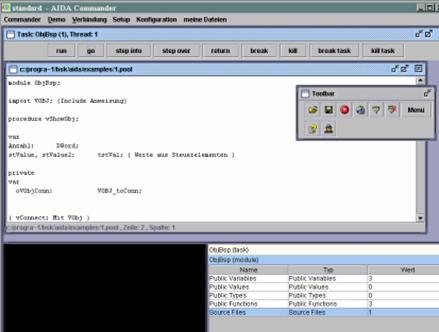
Figure 3: Debugger of the Commander
· The "Item Window" remains open in the background (in the lower right hand side of the figure). You can select variables and program parts in the window that you want to monitor.
· If you want to view several variables simultaneously, one "Item Window" will not be enough. In order to open another window you first have to select the variable. Now you can select the desired function with the right mouse button.
· This way you can also see how the corresponding version is declared. The edit window of the debugger will then automatically go the correct location.
· Breakpoints can be set by moving the cursor in the editor of the debugger to the correct line and then pressing the "space bar". The line is now marked and the program will halt there if it is operated appropriately.
Comments are an important component of any program. They are used to describe the meaning of variables, functions and instruction in plain text. Comments are removed by the pre-processor during compilation (see annex) and thus don't influence the size of the executable program. Only with good comments will it still be possible after an extended period of time to read and understand one's own program code without major efforts. Besides, comments are an indispensable help for other developers, who have to complete or add to an existing program.
Comments in POOL start and end with curved brackets and can be located anywhere in the program.
Example
{This is a comment}
Comments can include several lines.
Example
{This is a comment
that includes several lines}
Alternatively comments can also start with // . In this case the comment ends with the end of the line.
Example
// This is a comment that may not exceed one line
Constants are used to work with unchangeable values. They are merely described in the source code and not changed during runtime. If a frequently occurring number was used in the program as a constant, it can be changed in the entire program by making a one-time change to the declaration (before the compilation - see annex). A typical application is the specification of the length of an array (see section 4.1.8), which is used in several program parts. This specification can be used in loops that work with the array (see section 4.3.5).
Other possible examples are the number pi (p) or the Eulerian number e that can be used in any routine once they have been defined as a constant at the beginning of a program. By the way, pi is defined in the POOL.pi base library with highest accuracy, while e is generated via the logarithm function. Exceptional no prefix is added to such fundamental constants, since they are clear numbers already.
Example
const
nPi = 3.1415;
n_e = 2.718281828459;
nSizeArray = 10; {Number of array elements}
{var ....}
Variables are used for the intermediate storage of values such as figures and texts.
Variables are created by the programmer. To create them, a memory location is reserved in the computer's memory and a name is allocated.
The current value can be read anytime at the memory location or a new value can be assigned.
You can picture it as a cabinet with many drawers. Each drawer has a number (its memory address), a label (its name), and a content (its value).

Figure 4: Referencing a variable
There are different kinds of variables for different kinds of data types such as texts and numbers, which can be compared to drawers of different sizes.
Please observe when allocating names that they can consist of a succession of letters and numbers, which always have to start with a letter. Underscores are permitted, however, blanks and special characters are prohibited. The maximum length of the name is 63 characters. However, the names should be as short as possible.
Example
i8Counter {Variable name}
As you can see in the above example the data type is placed before the variable name (here an 8-Bit integer) in abbreviated form as a prefix. This procedure improves the legibility of the program code and has to be used for all variables. For a corresponding prefix list please see the POOL help text.
It is advantageous to allocate names that indicate the intended application. If the name contains two designations, the second one should once again start with an uppercase letter. In general try to avoid any kind of lingo, and since the POOL language components are already in English, English names are to be preferably used.
Example
i16PortValue {Compound variable name}
Since POOL is case-sensitive, it is imperative to observe uppercase and lowercase letters. Pool considers i32VAR and i32Var for examples as different variables.
Some names have already been reserved by POOL and must not be used for separate names. A distinction is made between language components that are generally written in lowercase letters and the basic types that have a mixed syntax.
Reserved names
absolute, and, array, begin, BCSTR, Boolean, breakfor, breakrepeat, breakwhile, Byte, ByteString, case, Char, CharString, const, constructor, contfor, continue, contrepeat, contwhile, destructor, div, do, downto, DWord, else, elseif, end, endcase, endfor, endif, endwhile, endwith, exit, external, false, for, forward, from, function, goto, if, IFR, import, in, inherited, Int8, Int16, Int32, Int64, label, loop, module, mod, nil, not, object, of, or, packed, Pointer, private, procedure, program, public, Real32, Real64, QWord, record, repeat, return, set, shl, shr, signed, static, String, then, to, true, type, UChar, UCharString, unsigned, until, var, variant, virtual, WChar, while, WideString, with, withopt, Word, WordString, xor
Reserved names are also called key words.
Declaration of a variable
To create a variable it has to be declared. Using our example, we select and label the drawer. A sequence of variable declarations is started with the key word var.
Example
var
i16Value: Int16; {Declaration of an integer variable}
Comment
It is also possible to declare several variables in succession. To do this, the key word var only has to be written once in front of the declaration.
Example
var
i16Value1, i16Value2, i16Value3: Int16;
i8Value: Int8;
Important
Please observe that an instruction line has to end with a semicolon! In this case, each execution step is considered an instruction.
Assignment of a value
The assignment of a variable's value can occur anywhere in the program (after the declaration). It corresponds to filling the drawer with content (value of the variable).
The first assignment of a value is called the initialisation. Initialisation or assignment of a value to a variable is not allowed during the declaration. If a variable is not explicitly initialized, the value 0 is automatically assigned by the POOL compiler and thus can be used in the program. However, part of a clean programming style is to explicitly initialize a variable before it is used.
Example
i8Var := 100; {Assignment of a value to the variable i8Var}
{The value of the variable is now 100}
The value of a variable can be changed again anytime. Of course, the old value is lost and, to remain with our example, the content is discarded and the drawer is re-filled.
Example
i8Var := 250; {New assignment of a value to the variable i8Var}
{The value of the variable is now 250 – the 100 is lost
in the process}
Global variables
Variables that have been created on the highest level within a module are considered global, in other words they can be accessed from within any module instruction. They keep their value from the start of the program execution to its end.
Local variables
Variables that have been created within procedures and functions are newly created whenever these subroutines are opened, and when exiting the routine they are deleted again; in other words, they are volatile.
Static variables
An initialisation has to occur for the static variables (assignment of a value) in contrast to the normal (global and local) variables during the declaration. Static variables keep their value from one function call to the next as opposed to the local variables. The key word for static variables is
static.
Example
static
boCondition: Boolean = false; {Declaration and initialisation of a
static Boolean variable}
You can learn more about the use of static variables in section 4.4.3, where we will deal with the use of static variables in functions.
The scope of a variable depends on the location of their declaration.
Usually, variables are declared in the private area of a module (corresponds to a POOL file), which limits their use to the module in which they were declared (local module or non-public variables).
Using our drawer example again, everything that is in the private area is located in the drawers of a private room that can only be opened by the owner of the room (within the module).
If variables are declared in the public area, they can also be addressed using other modules (public variables). They can be compared to kitchen cabinet drawers that are accessible to anyone.
Variables that are being declared within a function or procedure are only valid in the particular function or procedure (see section 4.4). These kinds of variables are generally used during the execution of a subroutine with the purpose of temporarily storing results. They are only valid as long as the subroutine is executed, and invalid between subroutine calls. For example you could directly declare a variable in the vMain procedure of our "Hello World" program, which would only be valid within this procedure, in other words between begin and end. In the following examples, you should always declare variables in the private area.
Please don't worry if you did not yet understand everything in this chapter. Simply re-read it after you are finished with the explanation of the subroutines.
Generally we make a distinction between four basic types of simple variables:
Boolean
The Boolean types represent logical values. These logical values are true and false. The request and storage of logical conditions are typical fields of application of Boolean variables.
Example
{Declaration:}
var
boValue: Boolean;
begin
{Initialisation:}
boValue := true;
end.
Integer
Integer types are integral (signed) or (unsigned) data types. Wherever they can be used, they provide significant savings in runtime and storage capacity in comparison to the use of Real variables (see next section).
The range of values of a variable is a result of the size (in bits) and the data type. The sign takes up one bit of the range of values.
In general, variables should only be as large as necessary and not as large as possible in order to save storage capacity.
Example
{Declaration}
var
i16Value: Int16; {Declaration of the variable i16Value as integer with
the range of value 16 bit}
begin
{Initialisation:}
i16Value := 35; {The value of the variable is 35}
end.
The following table provides an overview of the different integer variables. It also shows the prefixes that are used in the examples

Table 1: Range of values of integer types
Real
The Real types are real numbers (floating point numbers). Because of the increased storage capacity and computational effort compared to integers, the use of floating point numbers should be limited to cases that require them.

Table 2: Range of Values of Real Types
Example
{Declaration:}
var
r32Value: Real32;
begin
{Initialisation:}
r32Value := 35.3; {Important: Use a decimal point instead of a comma}
end.
Char
The data type Char is used to store individual characters. With characters we always refer to letters and not, as for instance in C, generic 8-bit values. For 8-bit values the data types Int8 or byte have to be used.
Example
{Declaration:}
var
cValue: Char; {Declaration of the variables}
begin
{Initialisation:}
cValue := 'A'; {Assigning the character A}
end.
Characters that can be assigned are upper and lower case letters, numbers, special characters and blanks.
String
Strings are data types that contain, apart from the data content, information on their length. The length indicates the number of data items. Please observe when using strings that the length of a string has almost no restriction. Thus, in practice they are dynamically administered in order to limit the required memory, and their size is adjusted to meet the requirements. The way strings are used in POOL is one of the features and a particular strength of this language.
Due to their capability and the inner structure, strings are - strictly speaking - not simple types, but more or less dynamically structured types. But since they can easily be used in POOL, they are regarded as simple types.
Typical applications of strings are storing of text data and their use as dynamical buffers.
Character strings
Character strings (CharString or String) are strings that are either enclosed using single quotation marks or double quotation marks.
If you want to use quotation marks in a string, a backslash \ is to be placed before them.
Example
{Declaration:}
var
csName: CharString;
begin
{Initialisation:}
csName := "This is a string"; {Assignment of a string}
end;
Byte strings
A more general kind of representation is accomplished with byte strings (ByteString). The elements of a byte string are not of the data type character but of the data type byte. As a result, these strings are very well suited for use as dynamic buffers. With the help of type casting (see section 4.1.7) character strings and byte strings can be transferred to one another. However, so far it is not possible to create byte strings as constants.
If you want to evaluate both character strings and byte strings in functions or procedures without making a distinction, then you can do this by using the key word BCSTR.
Outlook
The third part of the tutorial describes the many various library functions that are available for working with strings.
Type definitions
With the key word type you can create new data types that are based on the already existing types.
Example
type
shortInt = Int8; {The dew data type shortInt corresponds to Int8}
var
shIntVariable: shortInt; {Variable of the new data type}
Enumeration types
Enumeration types define ordered sets. The individual elements correspond to ordinal numbers starting with the value 0. They are used in the same way as ordinal constants. The only – but fundamental – difference lies in the fact that all elements that are defined in this set are of the same type. The compiler checks that only elements defined in this types ordered set can be assigned. A possible field of application is the transfer of enumeration types to subroutines (see section 4.4). Of course you do not yet have to study subroutines in further details at this point. But please try to memorize the relationships that are explained here. We will once again refer to this section at the end of the appropriate section.
Example (Enumeration.pool)
module TEST;
public
type
{Enumeration type days of the week}
tenDayOfWeek = (Monday,Tuesday,Wednesday,Thursday,Friday,Saturday,Sunday);
private
var
enDay: tenDayOfWeek; {Declare the variable of the type
day of the week}
procedure vTest (enDay: tenDayOfWeek); {Subroutine}
begin
{Output of the day of the week}
Writeln(enDay, " is the #", Ord(enDay)+1, " Day of the Week.");
end;
procedure vMain;
begin
{Transfer of the day of the week to
the subroutine. The subroutine
will put out "Tuesday".}
vTest(Tuesday);
end;
{Initialisation}
begin
end.
Comment
The example program shamelessly takes advantage of the fact that the Writeln routine also puts out enumeration types together with plain text names. This is not possible with any other programming language. Therefore you should not assume that enumeration types are a different type of text strings. The advantage of the demonstrated procedure lies in the mere fact that no values other than the elements Monday through Sunday can be transferred and therefore the possibility of errors is drastically reduced.
Exercise
Now it would be best if you created a new menu item (e.g., test ) as described in the introduction, which you can use to test the example program. Alternatively you can of course also overwrite "Hello World". Name your new test program test and add the above routine by copying it.
Try to pass a value to the subroutine that is not included in the enumeration type (e.g., Day instead of Tuesday).
The compiler will prevent this. You can see that, by doing this, you limit the transfer of allowed values and therefore prevent runtime errors that are due to invalid parameters (if you would simply transfer a string, the compiler would not be able to detect that Day is not part of the permissible parameters).
Once again: Each element of the enumeration type represents a value, starting with 0 for the first element, 1 for the second element and so on.. With the help of a type cast (Ord(...), see section 4.1.7) these values can be determined directly.
The output
After having become familiar with simple forms of variables, we can now deal with the output of values or strings in further detail.
You already learnt about a simple form in the introductory program "Hello World". In this program, the function Writeln was used to put out text. The text was passed as a string constant. The function can just as well be used to put out a variable of any type. It is also possible to put out variables and texts in any order. The separation is done using commas. If you want to have a line break within an output, you have to use the control statement \n (new line). In order to get a space between two texts or variable, you can use the control character \t (tab). A sound (beep) is put out via \a. To put out a control character as text, place a backslash \ before it.
Example (Output.pool)
module TEST;
private
var
i16Value: Int16;
csText : String;
procedure vMain;
begin
i16Value := 13; {Initialisation of the
variable}
csText := "Test"; {Assignment of a string}
Writeln(i16Value); {Output of the value}
Writeln("Value of the variable: ",i16Value);{Output of the value with text}
Writeln(csText,"string"); {Output of a string variable
and a string constant}
Writeln("1.Line\n2.Line"); {Line break using \n}
Writeln("\\n"); {Output of the characters \n}
Writeln("Number1\tNumber2"); {Insert tab}
Writeln("\\t"); {Output of the characters \t}
Writeln("\a"); {Output of a sound}
end;
begin
end.
Exercise
Experiment with the different output types and control characters to get a feeling for the formatted output of texts and values.
Type casting is necessary in computer operations between variables of different data types. It is either done implicitly by the compiler, while a check is performed whether the conversion is permissible, or explicitly by the programmer. The feasibility of the operation is always to be checked with explicit conversions. During the following operation example, an Int32 value is converted into an Int16 value. However, since the value 65535 exceeds the range of values of an Int16 variable, the overflow produces the resulting value -1.
Example
{i16Value is an Int16 variable}
i16Value := Int16 (65535); {The value of i16Value after the conversion is -1}
i16Value := Int32 (65536); {Is prevented by the compiler since i16Value is
of type Int16}
As you can see here, only the desired result data type (here Int16 or Int32) has to be placed in front of the value (in brackets) that is to be converted for type casting. For additional examples pertaining to the application of type casting please see the description of arithmetic operations.
Arrays (Vectors)
Arrays are constructs that are composed of several variables of the same type. The individual elements are addressed via indexes. The arrays have a special meaning in connection with loops, in which the individual components are addressed one after the other (see section 4.3.5).
If you want to poll 100 temperature sensors for instance and temporarily store their values in variables, it would have been necessary to create and write 100 integer variables based on our current knowledge. With the help of arrays you only create one "temperature sensor" array with 100 elements. This saves lots of time and work. 100 lines would have been necessary for the assignment of values up until now. With the array we can do this in 3 lines. More on this later in the description of the control structures.
Please see the Fig. 5 for the structure of an array.

Figure 5: Array structure
How the individual elements are addressed will become easier to understand, if you take a closer look at how they are used in the source code.
Example (Array.pool)
module TEST;
private
var
acArray: array[0..3] of Char;
procedure vMain;
begin
acArray[0] := 'a'; // Assignment to element 1
acArray[1] := 'A'; // Assignment to element 2
acArray[2] := '9'; // Assignment to element 3
acArray[3] := '?'; // Assignment to element 4
Writeln(acArray[0]); // Output element 1
Writeln(acArray[1]); // Output element 2
Writeln(acArray[2]); // Output element 3
Writeln(acArray[3]); // Output element 4
end;
begin
end.
First, an array of the data type character is created with a total of four elements. Please observe when doing this that the indexes in the selected example range from 0 to 3!
Next, the individual memory segments are initialized in the vMain procedure using different characters. Then, the content of the array is shown in Fig. 6:

Figure 6: Content of the array
Please note that only variables of the same type can be used in an array. All types that have been defined as data types up until then can be used. However, if you want to use a structure that includes different data types, then a so-called record (see next section) will become necessary.
Outlook
It is also possible to use arrays in arrays. Due to this fact multi-dimensional data structures can be implemented.
Example
var
acArray: array [0..1,0..1] of Char;
procedure vMain;
begin
acArray[0,0] := 'a';
acArray[0,1] := 'A';
acArray[1,0] := '9';
acArray[1,1] := '?';
end;
In this example a two-dimensional matrix was created and initialized with characters.

Figure 7: Two dimensional matrix

Figure 8: Matrix assignment
For further details pertaining to the use of arrays please refer to the POOL text by BSK, which can be accessed via the help function of the AIDA Commander.
Exercise
Please start experimenting with the above programs in order to memorize the use of arrays. Please observe when doing this that the program code has to be embedded in a module. If you have problems doing this, just review the introductory example "Hello World".
Record types
The use of records is already part of more advanced programming methods. Nevertheless, they will be introduced at this point with the help of a simple example. Since we also speak of structures in addition to records, we will use both terms in the following text.
Structures can be declared with the use of the key word record. They are a combination of several data, possibly of different types of data, into a larger type.
In contrast to arrays, it is also possible to store different data types in records. A good example for the use of structures is storing personal data.
Example (Employee1.pool)
module TEST;
public
type
tstStaffMember = record {Storing records of the type "staff member"}
csFirstName: String;
csLastName: String;
csStreet: String;
csCity: String;
i8HouseNumber: Int8;
i16ZipCode: Int16;
i32Salary: Int32; {Would be a good range of values}
end;
private
var
stKarl: tstStaffMember; {Storing a variable of type "staff member"}
procedure vMain;
begin
stKarl.csLastName:= "Schmitt"; {Assignment of the last name}
Writeln(stKarl.csLastName); {Output of the last name}
Writeln(stKarl); {Output of the entire structure}
end;
begin
end.
Important:
The example shows the consequent use of the name convention even with structured types.
The above example shows that the individual elements of the structure are accessed via the designation of the structure variable, followed by a point and the element name. This kind of access can also be found in the area of object-oriented programming, and we will encounter it a very often in the second part of the tutorial.
Of course it is also possible to create arrays of structures. They make it efficient to deal with data records. They make it possible for instance to store and administer the data records of all staff members in a company by using an array with the "staff member" structure. However, the data administration in this case is static, since the number of possible entries has to be already specified during the creation of the program. We will get to know a method for dynamic data administration in section 5.1.10 on linked lists.
Outlook
With public, global records the view of other modules onto the record fields can be limited by using the key words private and public.
Record types can be derived! More on the topics derivation or inheritance in the second part of the tutorial.
Variable data types can be created within a record by using the key word variant (they correspond to unions in c). All these elements start at the same base address in the memory, in other words they overlap each other.
In general, they shall only be created at the end of a record, or after the normal elements. No strings are allowed in this area. Please observe when using variant that the memory requirement of the largest data type used is reserved.
Example
type
Example = record
{The invariant elements of the program are listed here, e.g.,}
i16Vakue: Int16;
variant {The variant part starts here}
(i32L: Int32);
(dwDW: DWord);
(abB: array [0..3] of Byte);
end;
Object types
Object types are structured types that have separate subroutines in addition to the data (properties), the so-called methods. Since they are used in object-oriented programming, we want to refer to the second part of the tutorial, in which we will explain this concept and its implementation in POOL in further detail.
Pointers
Pointers are variables, in which the physical address of other data is stored. The address is some kind of number for a drawer, in keeping with our example from the beginning.
Since their application is part of an advanced programming method, we will present their usage in a separate section (5.1) at the end of the tutorial.
The with-instruction is used to guarantee a clearly arranged access to the elements of a record or an object. Let us assume you had to initialize a structure variable of the type staff member. The variable name would have to be written in front of each element.
Example
stKarl.csLastName := "Schmitt"; {Assignment of the last name}
stKarl.csFirstName := "Karl" {Assignment of the first name}
stKarl.csStreet := "MainStr."; {Assignment of the street address}
{etc.}
An elegant alternative to the above procedure is the with-instruction. When it is used, the variable name has to be entered only once. All elements that are located within the with block can be addressed by specifying their name.
Example
with stKarl do
csLastName := "Smith"; {corresponds to stKarl.csLastName :="Smith";}
csFirstName := "Carl" {corresponds to stKarl.csFirstName := "Carl";}
csStreet := "MainStr."; {corresponds to stKarl.csStreet := MainStr.";}
{etc.}
endwith;
The with instruction can also be nested, which makes it easier to access a structure that lies within a structure.
Unary operators merge with the subsequent operand with regard to priority. One of the most important unary operators is the address operator @, which you will get to know in detail in the section on pointers.
The other unary operator is the not operator resp. !, which is used to negate logical expressions or Boolean variables. The one's complement for integer operands is formed using the not operation.

Table 3: Unary operators
Example
i16Value := 1;
boVar1 := true;
Writeln(@i16Value); {Puts out the address of i16Value}
Writeln(not i16Value); {Puts out the one's complement of i16Value }
Writeln(!i16Value); {Also put out the one's complement of i16Value}
Writeln(not boVar1); {False is put out}
Writeln(!boVar1); {False is put out}
POOL offers a number of arithmetic operators that can be used to do calculations with variables and constant. Please ensure with all arithmetic operations that the output data type is correctly selected.
Table 4: Basic arithmetic operators
Addition, subtraction, and multiplication
Please observe when adding (as well as subtracting or multiplying) that the output data type is large enough to store the result. If you add, subtract or multiply two Int16 values, then the result can be an Int32 value. The variable in which the result is stored, has to be of the data type Int32 in this case. The compiler implicitly conducts the necessary cast operation. However, it can also be conducted explicitly for improved legibility of the code.
Please observe when subtracting that it is not possible to save a negative result in unsigned variables. In the case of a negative result, the new value is formed through an overflow of the data sector.
Example
i16Value1 := 3;
i16Value2 := 2;
i32Result1 := i16Value1 + i16Value2; {Addition of two values}
i32Result2 := i16Value1 - i16Value2; {Subtraction of two values}
i32Result3 := i16Value1 * i16Value2; {Multiplication of two values}
Division and modulo operator
Please avoid a division by zero in both division and when using modulo operators. If it is not intercepted or prevented by the programmer, it inevitably leads to a runtime error and thus to the termination of the program.
In divisions with integer variables the remainder is cut off. In order to obtain the remainder, the result has to be stored in a real type. When doing this, however, the improved accuracy results in a longer calculation time. Calculating with real numbers is also called "floating point" arithmetic.
Example
i8Res1 := 14 div 4; {The integer fraction of the division is 3}
i8Res2 := 14 mod 4; {The remainder of the division is 2}
With arithmetic operations it sometimes becomes necessary to use a cast operation.
Example
i16Res := Int16(i32Value div (Int32(i16Value)));
In this example an Int16 (i16Value) value is cast to Int32 as a divisor and the result, which has to be of type Int16, is reconverted into an Int16 value. In this case "casting" would also be done implicitly by the compiler, but the code becomes more legible through the explicit conversion. The operational sequence is specified through the brackets.
The typical rules of mathematics apply to the sequence in which operands are evaluated. First, the signs are evaluated. Evaluation continues with the multiplication, division, modulo, and shift operators (shift operators are described in section 4.2.5) which all have the same priority. Additions and subtractions are not done until all operations with a higher priority have completed.
If the precedence is identical, the processing usually occurs from left to right.
The processing sequence can be changed using brackets.
In order to improve legibility, it usually makes sense to use brackets, even if brackets are not absolutely necessary.
Example
i8Res := (3 + 2) * (3 - 1); {The result is 10, brackets are
evaluated first}
i8Res := 3 + 2 * 3 - 1; {The result is 8, the multiplication is
done first}
Other arithmetic functions
Other arithmetic functions such as sine and cosine can be found in the pool.pi library and will be treated in the third part of the tutorial.
Exercise
Write a small program that calculates the mean value of any two Int16 variables and assign the result to an Int16 variable. We will not be specifically rounding-off the result at this point.
Please use explicit cast operations in order to improve your understanding of the necessary type conversions during calulations.
Put out the result of your calculation and the remainder of the division as an integer in the output area of the commander.
Test your program and save it as Division.pool.
At this point we want to give you a hint pertaining to program testing.
With programs such as the one in this exercise it always is useful to test the thresholds of the range of values (here e.g., –32768 and +32767, in each case for both variables) in addition to the normal values (here e.g., 34 and 35) in order to find programming errors that are due to incorrect data types. These threshold tests are often able to uncover errors that occur due to range violations.
Example (Division.pool)
module TEST;
private
{Declaration of the variables}
var
i16Value1: Int16;
i16Value2: Int16;
i16ModRes: Int16; {Result of the modulo operator}
i16DivRes: Int16; {Result of the division}
{Main Procedure}
procedure vMain;
begin
{Division}
i16DivRes := Int16(Int32(i16Value1 + i16Value2) div 2);
i16ModRes := Int16(Int32(i16Value1 + i16Value2) mod 2);
{Output of the division result (5)}
Writeln("The result of the division is: ",i16DivRes);
{Output of the modulo result (1)}
Writeln("The result of the modulo operation is: ",i16ModRes);
end;
{Initialisation – Variables can also be initialized in vMain}
begin
i16Value1 := 8; {Variable 1}
i16Value2 := 3; {Variable 2}
end.
The following comparative operators are available in POOL:

Table 5: Comparative operators
Comparative operators are used to compare variables or constants that belong to the same type class. The value that results from this comparison is always a boolean type. The result is true, if the requirement is met, and false, if it is not met.
Example
i16Value1 := 2;
i16Value2 := 11;
{Comparing the value of two variables}
boCompare := i16Value1 >= i16Value2;
The result of the above example is the boolean value false, since i16Value1 is smaller than i16Value2. The variable that is used to save the result always has to be a boolean type. The comparative operators have the least precedence, in other words they are always evaluated last.
In POOL, comparative operators can also be applied to strings in contrast to other languages. With character strings the comparison is done character by character starting at the beginning of the string. If a string is longer than the other and both are identical except for the length, then the longer string is considered to be greater.
We will explain the use of comparative operators in further detail when we describe the flow control statements.
Please refer to section 5.1.5 for a comparison of pointers. The pointers will be explained there in further detail.
Exercise
Please experiment a little with the above example and try the different operators.
In addition to the comparative operators there are the logical operators. They can be used to link logical conditions with one another. The condition that can be used can either be a comparison result or a Boolean variable. Comparative operators have a lower priority than logical operators. Please use brackets to ensure a correct operational sequence.
The operators to be used are and resp. &, or reps. |, and xor.
Both conditions have to be met for the logic operation and in order to obtain the result true.
With the logic operation or the result is always true, if at least one of the two operands is true.
With the logic operation xor the result is only true, if exactly one of the operands is true and the other is false.

Table 6: Logical operators
Example (BooleanOperators.pool)
module TEST;
private
{Declaration of the variables}
var
i16Value1: Int16;
i16Value2: Int16;
i16Value3: Int16;
i16Value4: Int16;
boVar1: Boolean;
boVar2: Boolean;
boCompare: Boolean;
{Main Procedure}
procedure vMain;
begin
{Comparing the value of two conditions}
boCompare := (i16Value1 >= i16Value2) and (i16Value3 < i16Value4);
Writeln(boCompare); // The result of the comparison is
// false
boCompare := (i16Value1 >= i16Value2) & (i16Value3 < i16Value4);
Writeln(boCompare); // Result as above. Instead of 'and'
// it is also possible to use &
boCompare := (i16Value1 >= i16Value2) or (i16Value3 < i16Value4);
Writeln(boCompare); // The result of the comparison is
// true
boCompare := (i16Value1 >= i16Value2) | (i16Value3 < i16Value4);
Writeln(boCompare); // Result as above. Instead of 'or'
// it is also possible to use |.
boCompare := (i16Value1 >= i16Value2) xor (i16Value3 < i16Value4);
Writeln(boCompare); // The result of the comparison is
// true
boCompare := (boVar1) or (boVar2); // Comparison of Boolean variables
Writeln(boCompare); // The result of the comparison is
// true
end;
{Initialisation: Variables can also be initialized in vMain}
begin
i16Value1 := 1;
i16Value2 := 11;
i16Value3 := 22;
i16Value4 := 33;
boVar1 := true;
boVar2 := true;
end.
Programming beginners should consider this section only as an information and outlook. Nevertheless we recommend that you at least take a brief look at it.
To understand the operations it is essential to have a basic knowledge of the binary representation.
Bit shift operations have the same priority as mulitpication, division, and modulo operations pertaining to the execution sequence. Bit comparisons on the other hand have the least priority.

Table 7: Bit operations
Bit by bit shifting
Bit by bit shifting to the left by one digit corresponds to a multiplication by 2 in the binary system, similar to shifting a position when multiplying by 10 in the decimal system. Therefore, bit by bit shifting by a position to the right corresponds to a division by 2. These operations can be used for instance with standardization and data type adjustments instead of normal divisions and multiplication. Their advantage lies in a favorable run time performance. Each additional shifted position represents another multiplication or division by 2.
For specific applications of shift operations please refer to the technical
literature on programming of microprocessors.

Figure 9: The number 5 in binary representation
The variable after a shift to the left by one position:

Figure 10: The result is the number 10 (in other words 2*5) in binary representation
Example
i16Value1 := i16Value1 shl 1; {Bit by bit shifting by 1 pos. to the left}
i16Value1 := i16Value1 << 1; {Different syntax – same effect}
i16Value1 := i16Value1 shr 3; {Bit by bit shifting by 3 pos. to the right}
i16Value1 := i16Value1 >> 3; {Different syntax – same effect}
Important:
The range thresholds of the data type have to be observed again here.
Shift operations are not defined for floating point numbers!
Bit by bit logical 'and' operation
The bit operator and (or &) links the individual bits of two variables with a logical 'and'. The variables always have to be of the same data type. A logical 'and' operation of an Int32 and an Int16 variable does not make sense and is prevented by the compiler. A typical application is masking bits. It is possible to explicitly set individual bits to zero in a variable by using a logical 'and' operation, while the value of other bits is retained, if a logical operation with one is used.

Figure 11: Bit by bit logical 'and' operation
Example
i16Value1 := i16Value1 & i16Value2; {Bit by bit logical 'and' operation}
i16Value1 := i16Value1 and i16Value2; {Different syntax – same effect}
Bit by bit logical 'or' operation
The bit operator or links the individual bits of two variables with a logical 'or' operation. The variables always have to be of the same data type. A logical 'or' operation of an Int32 and an Int16 variable does not make sense here either and is prevented by the compiler. With the help of the logical 'or' operation individual bits can be explicitly set to 1 in a variable, regardless of their previous value.

Figure 12: Bit by bit logical 'or' operation
Example
i16Value1 := i16Value1 or i16Value2; {Bit by bit 'or' operation}
i16Value1 := i16Value1 | i16Value2; {Different syntax – same effect}
Bit by bit logical 'xor' operation
With the 'exclusive or' operation, one of the bits has to be 1 and the other has to be 0 to get a result of 1.
Individual bits of a variable can be inverted with the help of a logical 'xor' operation with one.
Figure 13: Bit by bit logical 'xor' operation
Example
i16Value1 := i16Value1 xor i16Value2; {Bit by bit logical 'xor' operation}
Because they are immensely important, we want to summarize the precedence of the operators once again at this point.

Table 8: Precedence of the operators
After the probably not too exciting introduction into the basic elements of the POOL programming language, you will learn how to control a program flow by using control structures in this chapter.
This will give you the ability to write your own programs and effectively use the capability of a computer to execute millions of commands in one second. With control structures a distinction is made between decisions (if, case) and loops (for, while, repeat).
Decisions are used to control program flow dependent on the conditions.
Loops are used to repeat certain instructions until a termination criterion is met.
The elements we learnt about up until now, such as variables and comparative operators, will be needed again.
In general, all kinds of control structures can be nested in one another or within themselves.
POOL uses if statements to make decisions, which are based on logical conditions. The decisions are made using boolean variables or comparative operators (see section 4.2.3). In the previous example programs the entire program code was executed. With if statements you have the possibility to execute commands or skip them depending on conditions.
Example
if i16Temp > 0 then {Only if the value of the variable
is greater than zero, there will}
Writeln ('Value is greater than zero'); {be an output on the screen}
endif; {End of the if statement, program
continues as usual}
The else Statement
You can use the else statement if you want to ensure that at least one conditions is always met when you use an if statement. The else branch is only executed, if the condition of the previous if statement does not apply.
Example
if i16Temp > 0 then {If the value of the variable
is greater than zero, there will}
Writeln ('Value is greater than zero'); {be an output on the screen}
else {i16Temp is lower or equal to zero}
Writeln ('Value is lower than zero'); {Output of the value}
endif; {End of the if statement, and the
program continues as usual}
Exercise
Let us assume you wanted to control the temperature of a room with the help of a small program. As soon as the temperature drops below 20°C the heating should be turned on. Once the temperature rises above 20°C, the heating should be turned off again. Please assume in this case that, in practice, our program is cyclically started every 20ms by the operating system. To become more familiar with the function of the if statement, though, we will complete the process only once. The temperature is available in the form of a variable. The heating is turned on and off via a boolean variable. How the temperature is calculated and the heating is actually controlled will not be of interest to us at this point.
Example (HeatingController.pool)
module HEATINGCONTROLLER;
private
{Declaration of the constant}
const
nTempThreshold = 20; {Specified temperature}
{Declaration of the variable}
var
i16Temp: Int16; {Current room temperature}
boHeatOn: Boolean; {Heating on = true, off = false}
{Main Procedure}
procedure vMain;
begin
i16Temp := 19; {At this point the temperature is
usually sensed}
if i16Temp < nTempThreshold then {If the temperature is lower
than the specified value}
boHeatOn := true; {Heating is turned on}
Writeln ('Heating on'); {Output of the state}
else {If the temperature is higher
or identical to the specified value}
boHeatOn := false; {Heating is turned off}
Writeln ('Heating off'); {Output of the state}
endif;
{From here on the program is executed again without conditions}
Writeln("HeatingVariable: ", boHeatOn); {Print the value of the variable
which controls the heating}
end;
{Initialisation}
begin
end.
Explanation
After the current temperature was read it is compared to the specified value. If it is lower than the specified value, the code following the if statement is executed and the code following the else branch is skipped. In this case the heating is turned on with the help of the boolean variable boHeatOn .
If the temperature is higher than the specified value, the commands in the if branch are ignored and the instructions in the else branch are executed, in other words the heating is turned off.
The else branch is always executed, if the if condition is not met. Alternatively to the else branch it would have been possible of course to use a second if-condition (temperature >= specified value). However, the use of the else statement is more elegant.
Each if statement can have an else statement, although it is not mandatory.
Starting with the endif statement the program continues running again regardless of the condition or the temperature.
We want to address another important issue at this point. In order to be able to easily read a program and to locate errors faster, it is a mandatory convention to indent code lines. That is code blocks like the if, else, and endif statements that belong together are always aligned with each other and the contained code lines are indented by two spaces.
As you could see in this example, we implemented an on-off control (without hysteresis) with very simple means, which already leads to a good control response in inert control systems.
Nesting of if statements
In general, if statements can be nested to any depth. Consequently, the program flow can be controlled dependent on several conditions. It will become apparent very quickly that formatting is important.
Exercise
Modify the previous example to print out a message that shows, whether the temperature is below a critical limit (15°C) or not. Please indicate also, when the temperature is above the maximum permissible limit (25°C).
The remaining functionality should remain the same while doing this.
Example (HeatingController2.pool) (only the actual loop in this case)
if i16Temp < nTempThreshold then {If the temperature is lower than the
specified value}
boHeatOn := true; {Heating is turned on}
Writeln ('Heating on'); {Output of the state}
if i16Temp < nMinTemp then {Value is below the critical
minimum temperature}
Writeln("Value is below the critical mininum temperature ");
else {Value is not below the critical
minimum temperature}
Writeln("Value is not below the critical minimum temperature");
endif
else {If the temperature is higher or identical
to the specified value}
boHeatOn := false; {Heating is turned off}
Writeln ('Heating off'); {Output of the condition}
if i16Temp > nMaxTemp then {Value is above the critical
maximum temperature}
Writeln("Value is above the critical maximum temperature");
endif
endif;
This program shows different nesting types of if expressions. Please observe that each if statement has to end with an endif. Besides, a semicolon has to follow the last endif.
Please also observe the execution of the comparative operators. Since the exercise calls for a warning, if the value is higher or lower than a critical threshold, the signs < and > are used instead of <= resp. >=. In order to detect errors that are due to the use of incorrect operators, a test of the threshold values is recommended again. Please use 14°C, 15°C, 16°C for the lower threshold. The upper threshold has to be tested in the same way.
As you can see, constants were used for the threshold values instead of fixed numerical values. As a result, the thresholds can be changed at a single point in the program (during the initialisation) for all applications. This not only saves work but also significantly lowers the probability of errors with subsequent changes.
The elseif statement
If there are several conditions that rule out one another, nesting does not offer the best solution to the problem. In these cases we use the elseif statement. With this statement you can scan additional conditions, if the if condition is not met.
In doing this, any number of elseif statements is possible, however, a maximum of only one can be executed during each run. An else branch can follow again after the last elseif. The use of this important construct can be best explained with the help of another example.
Exercise
The conditions that existed in our previous examples were heating on and heating off. Now we assume that we have a heating with four conditions. The conditions are: heater off (temperature >= 25°C), low heating (temperature < 25°C and >= 20°C), middle heating (temperature < 20°C and >= 15°C) and high heating (temperature < 15°C).
Write a new program that controls the heater in relationship to one of the four conditions.
To do this, put out the heat on the screen (you do not need to control the heating itself in this example).
Example (HeatingController3.pool) (only the actual loop in this case)
if i16Temp < nMinTemp then {Lower threshold}
Writeln("Highest heating stage activated");
{Two conditions have to apply in the following elseif branch}
elseif (i16Temp >= nMinTemp) and (i16Temp < nMiddleTemp) then
Writeln("Middle heating stage activated");
elseif (i16Temp >= nMiddleTemp) and (i16Temp < nMaxTemp) then
Writeln("Lowest heating stage activated");
else
Writeln("Heating off");
endif;
Please observe the range boundaries in particular. What happens, if i16Temp > nMinTemp is entered instead of i16Temp >= nMinTemp?
Just try it (with i16Temp = 15). Errors such as this one can have grave effects and have to be prevented with the already described threshold value test.
Experienced users might have noticed that the above solution can be written in even shorter form.
Solution
if i16Temp < nMinTemp then {Lower threshold}
Writeln("Highest heating stage activated");
{The i16Temp >= nMinTemp condition is guaranteed through the first
if statement and can be omitted in the elseif statement}
elseif i16Temp < nMiddleTemp then
Writeln("Middle heating stage activated");
{The i16Temp < nMiddleTemp condition is guaranteed through the second
if statement and can be omitted in the elseif statement}
elseif i16Temp < nMaxTemp then
Writeln("Lowest heating stage activated");
else
Writeln("Heating off");
endif;
With this version it is also impossible for the threshold error to re-occur.
Apart from the if statement there is another way to evaluate conditions: the case statement. The case statement is preferably used, if a variable can have more than two or three values. Cases like these can also be solved using the elseif statement, however, the case statement is more elegant in this case because of its simple structure.
Both integer and character type variables can be used. Real data types must not be used!
Example (Case.pool)
case i8State of {The value of the i8State variable
is checked}
0: Writeln("i8State = 0"); {Is executed, if i8State = 0}
{Add other commands starting here}
1: Writeln("i8State = 1"); {Is executed, if i8State = 1}
2: Writeln("i8State = 2"); {Is executed, if i8State = 2}
else {If no condition applies}
Writeln("Else branch: None of the values apply");
endcase; {End of the case statement}
Change the value of i8State and observe what happens to the output.
Explanation
The variable that is to be checked is specified behind case. The appropriate cases are written into the following lines, followed by a colon and the code that is to be executed. If no conditions applies, the else branch is executed.
With case statements it is possible to implement state machines in cyclically processed programs. The condition variable indicates the current state and has to be declared as static.
Exercise
Write a program that puts out the current state (from 1 to 3) in relationship to a status variable (Int8). A warning has to be put out, if the status variable is not initialized. This only makes sense of course with a cyclical program call.
Example (Case_StateMachine.pool)
case i8State of {The value of i8State
is checked}
1: Writeln("Current state is 1"); {Is executed, if i8State = 1}
2: Writeln("Current state is 2"); {Is executed, if i8State = 2}
3: Writeln("Current state is 3"); {Is executed, if i8State = 3}
else {If no condition applies}
Writeln("Warning - status variable not defined");
endcase; {End of the case statement}
The while statement is used to execute statements as long as a condition is met. If the condition is not met from the start, none of the statements contained in the while loop are executed.
Example
i8Condition := 0; {Initial condition}
while i8Condition < 10 do {While i8Condition is < 10}
Writeln(i8Condition); {Output of the variable}
i8Condition := i8Condition + 1; {Increase by 1}
endwhile; {End of the loop}
Test the program in order to understand the function. Next, change the initial value of i8Condition to 10 and test the program again. What happens? Why?
If the condition is always met with a while loop, the result will be a continuous loop, that can no longer be exited. This could happen in our example, if you would forget to increment (increase) the condition variable. A termination can be enforced by closing the commander.
Another possibility for exiting a loop depending on a condition is the break statement. Please see section 4.3.6 and section 4.3.7 for further details.
Exercise
Write a program using the while statement, which adds even numbers from 1 to 100 and puts out the sum.
Example (While.pool)
module TEST;
private
var
i16Sum: Int16;
i8Number: Int8;
{Main program}
procedure vMain;
begin
while i8Number <= 100 do {If the number is less than or equal to
100}
Writeln(i8Number); {Output of the current number}
i16Sum := i16Sum + i8Number; {Adding the numbers}
i8Number := i8Number + 2; {Increasing the number by 2}
endwhile;
{Output of the result}
Writeln ("The sum is: ", i16Sum);
end;
{Initialisation}
begin
i8Number := 2; {First even number}
i16Sum := 0; {Initial value of the sum equals zero}
end.
In contrast to the while loop, the repeat statement executes the statements in the core of the loop at least once regardless of the condition. The statements are repeatedly executed until the termination condition is met.
Example
i8Condition := 0; {Initial condition}
repeat {Start the loop}
Writeln(i8Condition); {Output of the variable}
i8Condition := i8Condition + 1; {Increase the variable}
until i8Condition >= 10; {Termination condition i8Condition >= 10}
Test the program in order to understand the function. Next, reset the initial value of i8Condition to 10 and observe the different behavior of the repeat statement in comparison to the while statement. What happens? Why? Please also observe the different formulation of the conditions. The while loop has a continuation condition and the repeat loop has a termination condition.
The repeat statement, too, can be exited with the break statement in dependance on a condition. Please see section 4.3.6 and section 4.3.7 for further details.
Exercise
Implement the program in 4.3.3 using a repeat loop.
Example (Repeat.pool)
module TEST;
private
var
i16Sum: Int16;
i8Number: Int8;
{Main program }
procedure vMain;
begin
repeat {Start the repeat loop}
Writeln(i8Number); {Output of the current number}
i16Sum := i16Sum + i8Number; {Add the numbers}
i8Number := i8Number + 2; {Increase the number by 2}
until i8Number > 100; {Until the number is higher than 100}
{Output of the sum}
Writeln ("The sum is: ", i16Sum);
end;
{Initialisation}
begin
i8Number := 2; {First even number}
i16Sum := 0; {Initial value of the sum equals zero}
end.
With for loops, the number of executions is already fixed at the beginning of the loop in contrast to the previous loops.
The big advantage of the for loop in comparison to the while loop is that the structure is more simple. Initialisation, increasing (incrementing) or decreasing (decrementing) the loop counter and scanning the condition are always combined in one statement.
Example
for i8Count := 1 to 20 do {For i8Count = 1 to i8Count = 20}
Writeln(i8Count); {Write the value of i8Count to the output}
endfor; {End of the for loop}
The example program puts out the numbers 1 to 20 on the screen. The variable i8Count has to be created as an integer type.
Exercise
In this exercise you will learn to use a for loop in conjunction with arrays. Imagine you wanted to poll 20 temperature sensors (or even more than that) in order to measure the mean value of the temperature in a warehouse. You have the possibility of creating 20 variables and to scan their values one by one. However, this will be a lot of work and will result in a poorer overview. And what are you going to do, if you have to process 1.000 or 10.000 instead of 20 values? The solution is to use arrays in combination with for loops.
Simply create an array of 20 elements and process the values in a loop.
Please re-read the section on arrays (section 4.1.8) if you need to.
Usually, the individual sensor values would be read using functions. However, since we did not yet deal with functions, simply write the same value into each element. This also makes it easy to check, whether the calculated mean value is correct. The individual values are also added in the for loop.
Please observe that the range of the variables must not be exceeded. To do this, you have to think about the temperature values that might occur. (Assume a max. room temperature of 50°C). With considerations like this one you should always assume a worst-case scenario. Save your program and name it for.pool.
Example (for.pool)
module TEST;
{Declaration of the constants}
const
nNumOfSensors = 20; {Constant number of sensors}
private
{Declaration of the variables}
var
{Array with the values of the temperature sensors}
i16TempSensor : array[1.. nNumOfSensors] of Int16;
i8Count: Int8; {Counter for the for-loop}
i16AverValue: Int16; {Mean value of the temperature}
{Main Procedure}
procedure vMain;
begin
i16AverValue := 0; {Initialisation}
for i8Count := 1 to nNumOfSensors do {For i8Count is 1 to nNumOfSensors}
i16TempSensor[i8Count] := 15; {Allocation of the current value
(usually calling a function)}
{Adding up the values}
i16AverValue := i16AverValue + i16TempSensor[i8Count];
endfor; {End of the for loop}
{Calculation of the mean value (incl. rounding off)}
i16AverValue := i16AverValue div nNumOfSensors;
{Output of the mean value}
Writeln("The mean value is: ", i16AverValue);
end;
begin
end.
The break statement can be used to prematurely exit the for loop.
The break statement is used to prematurely exit a while, repeat, or for loop.
You can for instance do a plausibility check of the temperature values in our mean value program. If the calculated temperature is below or above a certain specified value, you can assume that there is an error in measurement. In this case the loop can be aborted using break and the error can be evaluated (heating is turned off, a warning is put out, ...). The number of the sensor is stored in an error flag (a memory variable) in this case and evaluated with the help of an error processing routine.
Example (Break.pool)
for i8Counter := 1 to nNumValues do {For i8Counter = 1 to nNumValues}
i16Help := 15; {Assignment of the current value}
{Normal function call}
if (i16Help < 0) or (i16Help > 50) then {In case of an error}
Writeln("ERROR"); {Output of a warning}
_FlgErrFlag := i8Counter; {Store the defective sensor}
break; {Exit the for loop}
endif
i16AverValue := i16AverValue + i16Help; {Adding up the values}
i16TempSensor[i8Counter] := i16Help; {Saving the temperature value}
endfor; {End of the for loop}
Since the number 15 is always allocated as a temperature value in our example, there is never an error of course. In order to understand the effect of the break statement, you should therefore assign a value that produces an error.
Save your program again under for.pool.
In addition to the normal break command there are special break commands for each loop type that make it possible to exit loops from deeper levels (breakfor, breakwhile, breakrep). In the following example, which admittedly does not have any practical value, you now have a good opportunity to observe the function of the extended break statement.
With the help of the breakfor statement, the inner for loop is aborted.
Test the program and then change the breakfor into break. What happens? Why?
Example
(Breakfor.pool)
for i8Counter1 := -10 to 10 do
{For i8Counter = 1 to 10}
Writeln("For:", i8Counter1); {Output of the counter}
i8Counter2 := 10; {Initialisation of the second counter}
while i8Counter2 > 0 do {From 10 to 1 downwards}
Writeln ("While", i8Counter2); {Output of the counter reading}
i8Counter2 := i8Counter2 - 1; {Decrementing the counter}
if (i8Counter2 = i8Counter1) then {If Counter1 equals Counter2}
breakfor; {Exiting the for loop}
endif;
endwhile;
endfor;
The statements breakwhile and breakrep have the same effect as the statement breakfor.
If you don't want to execute certain statements within a loop in case of an error, but at the same time continue with the loop, the continue statement offers an elegant solution. The continue statement can be used for all types of loops that were explained above. As with the break statement there are continue commands, which refer to the loop type. They are contfor, contrepeat, and contwhile and have the effect that each innermost loop of the specified loop type continues running at the beginning.
Exercise
Let's use our averaging example again. Averaging was aborted in case of an incorrect sensor value in section 4.2.12. In practice it can make sense, however, to continue averaging the remaining temperature values in spite of one or several faulty sensors. The error processing that will become necessary is not of interest to us at this point.
Extend your program for.pool with the continue statement so that, in spite of the missing sensor values, the correct mean value of the correct sensor values is calculated.
Note
To do so, count the number of errors and store them in a variable.
The values should automatically alternate between correct and incorrect to test the program (this can for instance be done with an if-else statement).
Please make sure that there is no division by zero.
Example (Continue.pool)
procedure vMain;
begin
helpTemp := nTemp; {Current temperature value as a
constant}
i8ErrCount := 0; {Number of incorrect values}
i16AverValue := 0;
for i8Counter := 1 to nNumValues do {For i8Counter = 1 to nNumValues}
{Changing the temperature value for the simulation}
if helpTemp > nTemp then
helpTemp := helpTemp - 1;
else
helpTemp := helpTemp + 1;
endif;
if helpTemp > nTemp then {In case of an error (simulated)}
i8ErrCount := i8ErrCount + 1; {Counting the errors}
i16TempSensor[i8Counter] := -1; {Assigning an error value}
continue; {Skip the rest of the loop}
endif;
{The for loop code is executed from here on, if there is no error}
{Assignment of the current value, addition of the values}
i16TempSensor[i8Counter] := helpTemp;
i16AverValue := i16AverValue + i16TempSensor[i8Counter];
endfor; {End of the for loop}
if (nNumValues - i8ErrCount) > 0 then {Avoid a division by zero}
{Calculation of the mean value of the valid values)}
i16AverValue := i16AverValue div (nNumValues -i8ErrCount);
Writeln("The mean value of ",( nNumValues -i8ErrCount),
" valid values is: ", i16AverValue, " °C");
else
Writeln("All sensors defective");
endif;
end;
Subroutines are program parts that can be reused in the program once they have been written.
Imagine you had a number of statements such as a mathematical calculation that appears several times in a program.
Without functions or subroutines you would have to enter the same string of statements wherever the calculation is needed.
In addition to the space requirement in the file, the legibility and above all the maintainability of the code will deteriorate due to this fact. This results in a significant increase of possible errors.
With the function you write a string of statements exactly once and then call it at each location where it is needed.
The program branches at the location of the program call into the function, processes the commands that are included and then continues after the call instruction.

Figure 14: Calling a function
Comment:
You do not have to write basic mathematical functions yourself, since they are already included in the POOL standard libraries. They will be treated in detail in the third part of the tutorial.
Any number of parameters or values can be passed to a function. The data types that can be used are both simple types (integer, real or string) and complex types such as structures. In POOL it is also possible to pass optional parameters.
A function always returns exactly one value of a simple type, which can be subsequently processed in the calling program. If no return value is needed, please use procedures that are explained in the following paragraph.
Parameters are generally passed by value. This means that the passed value is a copy of the variable instead of the actual variable. Thus, in subroutines it is not possible to modify the values of the variables of the calling program. If you want to manipulate the value of the variable itself in a subroutine, then you have to pass the variable as reference or a pointer to the variable (see sections 5.1.8 and 5.1.9).
Functions can access all variables that are declared in the private and public area of the module, if the function is implemented in the same module as the main program.
The declaration of a function starts with the key word function, followed the function name, and the parameters in brackets. The declaration ends with a colon and the data type of the return value.
The following example shows the declaration (without the implementation of the actual functionality) and the call of a function that is used to calculate the surface of a circle. Please note the declaration of the formal variable r32Radius, which is assigned to the value of another variable or a constant, when the function is called. This variable can only be used within this function. The value of the variable and the number pi is passed to the function. The return value is assigned to the variable r32Surface:
Example
{Function declaration of r32GetSurface}
function r32GetSurface (r32Radius, r32Pi: Real32): Real32;
{Call of the function somewhere in the program, e.g., in vMain}
r32Surface := r32GetSurface(r32Radius, 3.14);
Insertion
It is also possible to evaluate the return value directly using an if-statement. However, the result will not be available for further processing:
Example
if r32GetSurface(r32Radius, 3.14) > 0 then
Writeln("Transfer O.K.");
endif
Exercise
Complete the above surface calculation example by implementing the function. If a value is passed that is smaller than or equal to 0, the value 0.0 has to be returned. Either the calculated surface or an error message will be put out in the calling program.
Example (SurfaceCalculation.pool)
module TEST;
private
{Declaration and definition of a function that calculates the surface of a
circle}
function r32GetSurface (r32RadiusPar, r32Pi: Real32): Real32;
begin
if r32RadiusPar > 0
then {If the radius is
positive}
r32GetSurface := r32RadiusPar*r32RadiusPar*r32Pi; {Surface calculation}
else
r32GetSurface := 0.0; {Error code -
r32RadiusPar value
inadmissible}
endif
return;
end;
{Main Procedure}
procedure vMain;
const
nrPi = 3.1415926; {Number pi as a constant}
{declaration of the variable}
var
r32Radius: Real32;
r32Surface: Real32;
begin
r32Radius := 10.0; {Radius is 10.0}
r32Surface := r32GetSurface(r32Radius,nrPi); {Call of the function
to calculate the surface}
if r32Surface > 0.0 then
Writeln("The surface has: ",r32Surface," units.");
else
Writeln("Invalid parameter.");
endif
end;
{Initialisation}
begin
end.
The variables and constants are declared in the main program vMain. As a result, they are valid only there and can not be modified in the r32GetSurface function although the function has full access to the variables that are declared in the private area of the module, since it is defined in the same module as the main program.
The number pi should generally be created as a constant. In our case it was only passed to show the different types of passing parameters.
The result of the function (return value) is returned by assigning the value to the function name.
Only primitive data types and the data type string can be used as a result of a function.
You can exit the current function or subroutine using the return statement.
It is also possible to call additional functions from within a function.
Functions can also call themselves. This is called recursion and is part of the advanced programming methods. You can find an example pertaining to this method in the section on linked lists.
After you have become familiar with the subroutine functions, you should repeat the section on the scope of variables (section 4.1.4).
Outlook
In this example the complete function declaration and implementation was done in the private area of the module. Thus, the function can of course only be used within the module. If you want to declare the function without immediately writing the statement block, you can do this with the help of the key word forward. This can become necessary for instance to make the interface in the public area accessible to other modules without disclosing the implementation of the actual function. This declaration will also become particularly necessary, if functions call each other.
Example
public
function r32GetSurface (r32RadiusPar, r32Pi: Real32): Real32; forward;
In the public part of modules, all declarations of functions and procedures are automatically forward, as long as they are not explicitly declared external.
Example
public
function r32GetSurface (r32RadiusPar, r32Pi: Real32): Real32;
This declaration exactly corresponds to the last one, since the function is declared in the public area. You can find more on the scope of variables in the description of the program structure and working with several modules in section 4.5.
The implementation of a function can only occur in the private area of a module, in contrast to the declaration.
The declaration external indicates to the compiler that the procedure, function or method (see tutorial part 2) is not available as POOL code. This type of function, which then has to be available as an executable code, is called via an index of data type unsigned int, which is specified after the key word extern.
Modifier
As an extension to the normal functions it is also possible to specify the so-called function modifiers. They are a type of compiler switches with limited area of effectiveness. In this case, the modifier has to be written at the end of the function declaration.
There are three types of modifiers: BCSTR, IFR and WITHOPT.
BCSTR identifies functions that are defined using parameters and return values of type CharString, but are supposed to work also with ByteStrings.
Functions are identified with IFR, if their use should be permitted as a procedure (see next section), in other words without using the function result.
WITHOPT is reserved for future use and does not yet have any meaning at this time.
Parameter types
So far we have only been dealing with the call by value. The call by addresses will be described in further detail in sections 5.1.8 and 5.1.9.
In contrast to functions, procedures do not have a return value. You have already used a typical example for a procedure, the procedure Writeln, to which you passed an text as parameter:
Example
Writeln("This is a procedure.");
Only WITHOPT exists as a modifier for procedures.
Otherwise, the use of procedures corresponds to the use of functions as was described in the previous section.
Since you are now familiar with subroutines, you should repeat the exercise on passing string parameters using enumeration types (see section 4.1.5).
A special feature of static variables that is described in section 4.1.3 is that they keep their value between the function resp.. procedure calls. This allows for instance to implement iterative algorithms and state machines. Please observe when doing this that the value of public static variables can be changed, if the function is called by another module. Therefore, a function that contains static variables shall generally only be called from one location. An example for this is the iterative calculation of a controlled variable of a PI controller.
The following shows a simple example that illustrates the operating principle of static variables:
Example (Static.pool)
module TEST;
public
{Public function declaration}
function i16CallCounter : Int16;
private
{Definition of the functions}
function i16CallCounter : Int16;
static
i16StaticCounter: Int16 = 0; {Declaration and
initialisation of the
static variable}
begin
i16StaticCounter := i16StaticCounter + 1; {Increasing the static
variable by 1}
i16CallCounter := i16StaticCounter; {Return of the value of the
static variable}
return;
end;
{Main program }
procedure vMain;
{Declaration of local variables}
var
i8ForCount: Int8; {Loop counter}
i16CounterValue: Int16; {Save the return value of the
function}
begin
for i8ForCount := 1 to 10 do {Execute 10 times}
i16CounterValue := i16CallCounter; {Call of the function}
{Output of the value of the static variable}
Writeln("Value of the counter after calling the function ",i8ForCount,
" times : ",i16CounterValue);
endfor;
end;
begin
end.
The static variable is initialized with zero before the program start and incremented each time the function is called. The value of the static variable retains when the function exits. The initialisation is skipped the next time the function is called and the value of the variables is incremented again. Thus the variable counts how often the function was called.
In all subroutines, it is allowed to do a function call in the parameter list , which returns a value that is used as parameter to the subroutine. Please notice when doing so that the sequence of parameter evaluation is up to the compiler manufacturer. The evaluation in POOL is done from right to left.
This becomes an issue whenever the return value of a function depends on the point in time resp. the order of function calls, and if it is used more than once within a function call.
You should test the following example to understand this important relationship.
Example (PassingParameters.pool)
module TEST;
private
{Definition of the functions}
function i16CallCounter : Int16;
static
i16StaticCounter: Int16 = 0; {Declaration and
initialisation of the
static variable}
begin
i16StaticCounter := i16StaticCounter + 1; {Increasing the static
variable by 1}
i16CallCounter := i16StaticCounter; {Return of the value of the
static variables}
return;
end;
{Definition of the functions}
procedure vTest(i16Var1Par,i16Var2Par,i16Var3Par: Int16);
begin
Writeln("i16Var1Par: ",i16Var1Par); {Output of the first
parameter}
Writeln("i16Var2Par: ",i16Var2Par); {Output of the second
parameter}
Writeln("i16Var3Par: ",i16Var3Par); {Output of the third
parameter}
end;
{Main program }
procedure vMain;
begin
{Transfer of the function results by i16CallCounter to the function vTest}
vTest(i16CallCounter,i16CallCounter,i16CallCounter);
end;
begin
end.
If the function i16CallCounter is called several times, it will each time return a value that is incremented by 1. Since the parameters are indexed from left to right and the evaluation is done from right to left, the values will be assigned to the indexed variables in reverse order. As a result, the following output will appear on the screen:
Screen Output
i16Var1Par: 3
i16Var2Par: 2
i16Var3Par: 1
However, when functions are used whose return value is independent from the point in time and the calling sequence, the sequence of the parameter evaluation is not important.
In the first example program "Hello World" you already gained some insight into the structure of a POOL program or a POOL module. After you have now become familiar with the basic elements of the POOL programming language such as variables, loops and subroutines, we can delve into more details of the POOL program structure.
In contrast to programming languages such as C, which have a process-oriented structure, there is usually no actual main program in POOL.
Instead, data structures, procedures, functions etc. are combined and compiled in individual modules. In general it has to be observed that only one module can be implemented for each file (compiler-dependent). The module name should match the file name to make things easier.
After all the necessary modules have been created and loaded, all public elements are available to the user. The instructions of the user constitute the actual main program .
Up until now you have only been working with a single module. In the following we will describe the elements of a module again in further detail.
Our example will be a program, which calls a function of another module to calculate the surface of a circle and then puts out the result.
The program from which the function is called can be viewed as some kind of main program, in whose vMain routine the basic program is implemented. First, see the explanations pertaining to the individual program sections and their processing when the module is activated by the commander.
The module name is listed in the first place again:
Example (Mainprog.pool)
module MAINPROG; {Main program}
After the module name, other modules that are to be used in the actual module are imported using their name. The key word to do this is import.
import SURFACE; {Module or modules that are used by this module}
When the module is imported, it is also always initialized right away, in other words even before the calling module is initialized.
Afterwards, the public elements of the imported modules are available.
If the modules are located in another directory than the module in which they are used, the path name has to be provided as well. When doing this, only relative path names are permissible, since absolute path names are not supported in the current POOL version.
Example for a relative path name:
import SURFACE from "bin/SURFACE.PI";
The public area includes functions, procedures and variables that can be used by other modules. In this context we also speak of public elements of the module. These elements can also be directly addressed via the commander. The area before the key word private is a public area by default. For better legibility you should explicitely specify the keyword public. We do not need any public elements in our main program.
public
{The declarations of functions and procedures that are available to
other modules are listed here (prototypes for the export)}
var {Omit for testing}
{Variables that are available to other modules are listed here}
After the public area follows the private area, in which non-public variables have to be declared. They can only be used within the module. In general, variables always have to be declared private. If you want to change a variable from within another module, then you should provide a function or procedure to do so. You can find more on this topic in Tutorial 2 on object oriented programming.
private
{Declaration of the variables}
var
r32Radius: Real32;
r32Surface: Real32;
The actual implementation of the functions and procedures is located in the private area. First, the Init routine is processed that is located at the end of the module (see the end of the program listing). General initialisation is done there, such as assining variables with an initial value (initialisation mostly with 0)..
Next, the statements in the vMain procedure are processed. That way you can implement some kind of main program, that calls functions of other objects.
A module does not have to have a vMain procedure as you will see later on.
{Main Procedure}
procedure vMain;
begin
r32Radius := 2; {The radius is 2}
r32Surface := r32GetSurface(r32Radius); {Call of the function that is used
to calculate the surface}
if r32Surface > 0 then {Return value O.K.}
Writeln("The surface is: ",r32Surface," units.");
else {Incorrect return value}
Writeln("Incorrect return value");
endif
end;
After vMain was processed, the vDeinit procedure is executed, provided it exists, and then the program is finished.
This procedure is used for deinitialisations. More on this topic in Tutorial 2. At this point we will only put out the text deinitialisation in order to be able to better track the program flow.
procedure vDeinit;
begin
Writeln("Deinitialisation of the module MAINPROG");
end;
As already mentioned before, the initialisation that is executed first when the module is called, is listed at the end of the program. It ends with end. (Period!!!).
begin
Writeln("Initialisation of the module MAINPROG");
end.
After we have written the main module, we get to the SURFACE module, which provides a function to calculate the surface of a circle.
The r32GetSurface function is declared as public function, so that it can be accessed by other modules. Thus, it serves as an interface between the individual modules.
In general, an interface is the area that is used to exchange data and statements between different parties (e.g., modules) based on a specified procedure (protocol). When the interface it specified, the exact in and output of functions and procedures has to be specified.
Example (Surface.pool)
module SURFACE; {Module containing the function to calculate the surface}
public
{Public function declaration that can be used in other modules}
function r32GetSurface (r32RadiusPar: Real32): Real32; forward;
Variables and constants are created as private elements, since the access to elements of the module should only be possible via public functions and procedures.
private
const
nrPi = 3.1415926; {Number pi as a constant}
{Declaration of private variables at this point}
The actual implementation of the function is also done in the private area. Thus, it is strictly separated from the public declaration.
{Private implementation of the function used to calculate the surface}
function r32GetSurface (r32RadiusPar: Real32): Real32;
var
r32Help: Real32; {Help variable (not
absolutely necessary)}
begin
if r32RadiusPar > 0 then {If the radius is positive}
r32Help := r32RadiusPar*r32RadiusPar*nrPi;{Calculation of the surface}
r32GetSurface := r32Help;
else {Negative radius}
r32Help := 0.0; {Error code - parameter value
inadmissible}
r32GetSurface := r32Help; {Return of the error value}
endif
Writeln("Result of the function: ",r32Help);
end;
The strict separation of implementation and interface is of central importance.
First it is often important to protect the source code and therefore one's own know-how, but at the same time make it possible for users to utilize the functions.
Second the code can be changed easily without affecting the code in dependent modules. The only thing that has to be observed is that the interface is preserved according to specification.
Figure 16: Module access
Fig. 15 shows the access of module 1 to module 2. The access to the public area is possible, but not the access to the private area. If module 1 wants to access to private elements in module 2 for instance to read or change the value of a variable, then this will only be possible via public functions that are provided by module 2. This prohibits unauthorized manipulation of variables.
Please observe the declaration of the local variable r32Help when you are implementing the function. Since it was declared within the function, it is only known there. An access from outside the function is not possible (see also section 4.1.4).
We will use the help variable later on to illustrate the procedure during the call of the module.
A text is put out again in the initialisation and deinitialisation area in order to be able to better track the work flow during the call of the function.
{Deinitialisation}
procedure vDeinit;
begin
Writeln("Deinitialisation of the module SURFACE");
end;
{Initialisation}
begin
Writeln("Initialisation of the module SURFACE");
end.
First, create the SURFACE module and open it with the commander (see also section 3.2.1).
Next, execute it using the commander. After you have opened the module you can execute the r32GetSurface(Real value) function in the input/output window of the commander which prints the result to the screen.
Note
You can use any number for the data type real as value for the radius.
Simply use the menu command connection à close to terminate the program.
This example shows how to access a loaded module using the commander.
The entry of individual statements in the command line in order to call compiled program parts is one of the major strengths of the AIDA system and the POOL programming language. This allows to test the functionality of a single module independent of other modules.
After you have successfully tested the module, you can now create, compile and open the main program (MAINPROG module) with the commander.
Next, execute the main program and observe the sequence in which the individual program commands are processed with the help of the outputs on the screen. First, the SURFACE module is imported and thus loaded. While doing this, the module is initialized. Next, the main module is initialized.
After the initialisation has finished, the vMain procedure is called. In this procedure the r32GetSurface function is called. After the function and vMain have been processed, the MAINPROG module is deinitialized. It is only then that the imported module is closed resp. unloaded and thus the deinitialisation of the module is called.
Exercise 1
Write a main program to call a function that calculates the circumference of a circle. You can simply add this function to the SURFACE module of course. However, you should then change the name of the module to CALC_CIRCLE for instance.
Nevertheless, it makes more sense to create a new main module and a module with this function in order for you to gain more practice in dealing with several modules. First, test the function in the commander again before you test the entire program.
Example (Calc_Circle.pool)
{Private implementation of the function used to calculate the circumference}
function r32GetExtent (r32RadiusPar: Real32): Real32;
var
r32Help:Real32; {Help variable to help illustrate
the program flow}
begin
if r32RadiusPar > 0 then {If the radius is positive}
r32Help := 2 * r32RadiusPar * pi; {Calculation of the circumference}
r32GetExtent := r32Help;
else
r32Help := 0.0; {Error code - parameter value
inadmissible}
r32GetExtent := r32Help;
endif
Writeln("Result of the function: ",r32Help);
end;
Exercise 2
Write a procedure, to which a structure (record) of the type staff member (see section 4.1.8) is passed. The last name and first name are to be put out in the procedure. To do this, create three variables and initialize them in the Init routine with the last name and first name. Next, call the procedure from within a for loop.
Implement three modules for this program. The module with the main program, the module with the function, and another module in which the staff member type is declared. Comment: Of course, the staff member type could be listed in one module together with its functions. However, at this point you should experiment with the interaction of several modules.
Solution
{First module EMPLOYEE.pool}
module EMPLOYEE;
public
type
tstStaffMember= record {Create a "staff member" structure}
csFirstName: String;
csLastName: String;
csStreet: String;
csCity: String;
i8HouseNumber: Int8;
i16ZipCode: Int16;
i32Salary: Int32;
end;
private
{Initialisation}
begin
end.
{Second Module OUTPUTEMPLOYEE.pool}
module OUTPUTEMPLOYEE;
import EMPLOYEE; {Import the structure declaration}
public
{Declaration of the procedure}
procedure vOutputRecord(stPerson: tstStaffMember);
private
procedure vOutputRecord(stPerson: tstStaffMember);
begin
Writeln(stPerson.csLastName); {Output of the last name}
Writeln(stPerson.csFirstName); {Output of the first name}
end;
{Initialisation}
begin
end.
{Third module MAIN_EMPLOYEE.pool}
module MAIN_EMPLOYEE;
import EMPLOYEE; {Importing the structure}
import OUTPUTEMPLOYEE; {Importing the function}
private
const
nNumOfPersons = 3; {Number of staff members}
var
i8Count: Int8; {Loop counter}
i16Test: Int16;
pTest: ^Int16;
{Declaring an array of the structure staff member}
astPerson: array[1.. nNumOfPersons] of tstStaffMember;
{Main program }
procedure vMain;
begin
for i8Count := 1 to nNumOfPersons do {For all staff members}
vOutputRecord(astPerson[i8Count]);
endfor;
end;
{Initialisation}
begin
{Initialisation of the variables}
astPerson[1].csLastName := "Schmitt";
astPerson[1].csFirstName := "Karl";
astPerson[2].csLastName := "Hock";
astPerson[2].csFirstName := "Josef";
astPerson[3].csLastName := "Schadt";
astPerson[3].csFirstName := "Peter";
end.
Please observe when passing the structure by value that the entire structure is copied. This puts an unnecessarily high load on the system. In order to avoid this you have the possibility to pass the structure by reference and thus work with the original structure.
More on references in the next section.
In this chapter we will discuss some more advanced programming topics like pointers and references. We will also give a brief description and the compiler switches and command parameters as well as explain the use of conditional compiling.
Pointers and references are powerful and one of the more exiting topics of programming languages as well as one of the most difficult ones. The incorrect use of pointers often leads to the termination of the program or at least to mostly difficult to locate errors. Please take your time with this chapter and re-read the individual paragraphs as often as needed.
The use of pointers is not trivial at all and cannot be learnt in a one day course. First, try to understand the basic priciples of pointers without thinking about how they are used. Many application possibilities will be described using examples after the basics have been explained.
Up until now, we have always accessed variables using their names without thinking about where they are located in memory. By doing this, we have used a name as a synonym of the variables memory area. As we already mentioned before, the content of a variable is located at the address in the memory that bears its name.

Figure 16: Variable name corresponds to the address containing the variable's value
Depending on the data type, the variable occupies a consecutive number of bytes in the memory starting at its so called base address.

Figure 17: Memory assembly
Fig. 17 shows the basic organization of a memory. We will limit the memory to 8 bytes in this case. In practice, the size of the memory will be significantly larger. The total storage capacity that is available depends solely on the system that is used.
The assignment of memory to the individual variables appears to be a random one from the programmer's view. In reality, it is done based on a system of course, but this will not be of interest to us at this point (since this is done by the compiler).
In our example the first byte is assigned to a boolean variable (yellow) starting at the address $A0000000. Next, there is a free memory area (green) that also has the size of one byte. Starting with start address $A00000002 there is an Int16 variable (light blue) that uses up two bytes of memory. The last 4 bytes are occupied by a pointer variable (purple).
The address of a variable can now be stored in a separate variable of type pointer, which always occupies 4 bytes of memory for the addresses of the variables. This variable is then called a pointer. Its value (data) is the memory location of another variable, therefore it more or less "points" to it.

Figure 18: Content of a pointer in general form
Since the pointer is a variable, it is also has an address and a name. This address is displayed below the actual memory location in Fig. 17. As a result, the addresses of the variables do not require a separate memory location. Please remember our example with the drawers. The drawer label is located on the outside and thus does not use up any space inside the drawer.
The address of the pointer itself is not of interest to us at this point. However, we will return to this issue when we explain double pointers. In Fig. 19 you see an example that shows the relationship of data, addresses a pointer that points to the data.

Figure 19: Content of a Pointer Based on an Example
The following syntax is used to declarate the pointer:
Example
var
i16Test: Int16; {Creating an Int16 variable}
pTest: ^Int16; {Creating a pointer of type Int16}
The example shows a typed pointer to an Int16 variable. Only the address of a variable of the correct data type can be assigned to a typed pointer. On principle however, pointers can refer to all data types. They merely point to an address in the memory.
Assigning a variable's address to a pointer is done using the address operator @. The address operator precedes the variable and provides the variable's address. After the assignment, the value of the pointer is the address of the variable!
You can also say, the pointer contains a reference to the variable.
You should memorize this fact very well, since it is the key to understanding pointers.
Example (Pointer.pool)
procedure vMain;
begin
i16Test := 23; {Assigning a value to the variable}
pTest := @i16Test; {Assigning the address of i16Test to the pointer}
Writeln(pTest); {Output of the address}
end;
Please don't hesitate testing the program code yourself. The output will be the value of the pointer, in other words the address of i16Test. Please also try to assign the address of an Int8 variable to a pointer of type Int16.
When doing this, you will see that the compiler performs a strict type checking of pointers.
Of course, we are usually not interested in the address of the variable, but its value. In order to access the value, the pointer has to be dereferenced. To dereference, the ^ sign is put behind the pointer variable. The following shows an example.
Example (Pointer.pool)
procedure vMain;
begin
i16Test := 23; {Assigning a value to the variable}
pTest := @i16Test; {Assigning the address to the pointer}
Writeln(pTest^); {Output of the value of the variable}
end;
In this example the value (23) of the variable to which the pointer points is put out. Please observe the difference to the previous example, in which we put out the address!
By accessing the pointer we are also able to change the value of the variable. In the following example we will change the value of the variable (not the pointer) via the pointer access. In this case we also have to use the dereferencing operator in order to access the value and not the address.
Example (Pointer.pool)
i16Test := 23; {Assigning a value to the variable}
pTest := @i16Test; {Assigning the address to the pointer}
pTest^ := 12; {Changing the value of i16Test}
Writeln("Value of the pointer: ", pTest,
", value of the variable using pointer: ", pTest^,
"\nValue of the variable: ", i16Test);
When doing this it is important that we have reading and writing access to the variable by deferencing. That is, we obtain access to the actual memory area of the variable i16Test. To get a better understanding please review the figures at the beginning of this section.
Pointers to arrays
Pointers to arrays follow the general principle. However, you have to pay attention to whether a pointer to the array is used or a pointer to the elements of the array.
Please experiment a little with the following example by changing the index of the address allocation.
Example (ArrayPointer.pool)
var
acArray: array[0..1] of Char; {Char array}
apcArray: array[0..1] of ^Char; {Array of pointer to Chars}
pacArray: ^acArray; {Pointer to Char array}
{Main program}
procedure vMain;
begin
acArray[0] := 'a';
acArray[1] := 'B';
apcArray[0] := @acArray[0]; {Assign the address of the first element}
apcArray[1] := @acArray[1]; {Assign the address of the second element}
pacArray := @acArray; {Assign the address of the array}
Writeln("Array element 0: ", apcArray[0]^);
Writeln("Array element 1: ", apcArray[1]^);
Writeln("Array address: ", pacArray);
Writeln("Array element 1: ", pacArray^[1]);
end;
Important
Above all, please notice the difference between pacArray^[1] and apcArray[1]^. The correct and consistent use of prefixes of the nomenclature rules provides a distinctive clarity.
Very important
Due to the strict type checking in POOL defined pointers are not necessarily allocation-compatible through "type pacArray: ^acArray" and "type pacArray: ^array[0..1] of Char", even though in both cases they are based on the same definition. POOL demands a higher degree of thoroughness from the developer during his/her work in order to achieve a high degree of quality.
You will get to know additional options for working with pointer to arrays in section 5.1.7 on dynamic memory management.
Note
Only for people who are familiar with C: It is always clearly defined in POOL what the actual variable is and what a pointer to the variable is. The curious fact that is found in C that the straight array name without an index corresponds to a pointer to the array does not exist in POOL.
Pointer to records
It is possible to access individual elements of a record using pointers.
We will use the tstStaffMemver record you already know from the example in section 4.1.8. Try to experiment a little with the following example to become familiar with the use of pointer to records or structures. We will often use this kind of access in the second part of the tutorial.
Example (RecordPointer.pool)
var
stKarl: tstStaffMember; {Declaring a
variable of the structure
staff member}
pstStaffMember: ^tstStaffMember; {Declaring a pointer of type
staff member}
{Main program }
procedure vMain;
begin
pstStaffMember := @stKarl; {Assign the address to the pointer}
stKarl.csLastName := "Schmitt"; {Direct allocation of the last name}
pstStaffMember^.csFirstName := "Karl";{Assign the first name
via pointer access}
Writeln(pstStaffMember^); {Output of the entire structure}
Writeln(pstStaffMember^.csLastName); {Output of the last name}
Writeln(pstStaffMember^.csFirstName); {Output of the first name}
end;
The example with Writeln(pstStaffMember^) or with Writeln(stKarl), which is possible also, shows, how the entire structure of a record can be put out. This is a particular feature of POOL, which can't be found in other languages, and it works with all variables, regardless whether they are structured or simple, it even works with pure types.
The nil pointer is a predefined pointer with a value that does differ from all the regular pointers. The key word to initialize a pointer as nil pointer is nil. Pool automatically initializes any pointer that has not been initialized with nil. Dereferenceing a nil pointer by accident terminates the program caused by a run time error.
Possible applications are the return of the nil pointer to indicate a function error, and the use in linked lists to indicate the end. The error can be detected and handled in the program part that is calling by using comparison operators. More information on nil pointers is provided in the section on linked lists.

Figure 20: The nil pointer
Important
The value nil is not to be confused with the value 0. It is up to the compiler how a nil-pointer is represented internally. POOL intentionally prohibits to assign 0 to a pointer, which appears again and again elsewhere although it is an improper thing to do.
The only operators that are defined for pointers are = (equal) and <> (unequal).
Comparisons are only permissible, if the pointers are of the same type or at least one of the pointers is of the type Pointer (see next section) or nil.
Please notice that, when comparing two pointers without dereferencing, the addresses to which they point are compared and not the values.
Experiment for a while using the following example in order to understand the use of the nil pointer.
Example (NilPointer.pool)
var
i16Test: Int16;
pTest: ^Int16;
{Main program }
procedure vMain;
begin
i16Test := 12;
pTest := @i16Test;
pTest := nil;
if (pTest = nil) then
Writeln("pTest is the nil pointer")
else
Writeln(pTest^);
endif;
end;
Exercise
Test the following example in the commander. Why doesn't the condition apply? Please change the program in two different ways so that the condition is met.
Example (PointerComparison1.pool)
var
i16Test1: Int16;
i16Test2: Int16;
pTest1: ^Int16;
pTest2: ^Int16;
{Main program}
procedure vMain;
begin
i16Test1 := 12;
i16Test2 := 12;
pTest1 := @i16Test1;
pTest2 := @i16Test2;
if (pTest1 = pTest2) then {Comparison of two pointers}
Writeln("Both have the same value")
else
Writeln("Both have different values");
endif;
end;
Solution
The requirement does not apply since the values of the pointers, in other words the addresses to which they point, are compared and not the contents. In order for the requirement to apply, there are two possible solutions depending on the application.
Solution
{First possibility (PointerComparison2.pool)}
procedure vMain;
begin
i16Test1 := 12;
i16Test2 := 12;
pTest1 := @i16Test1;
pTest2 := @i16Test1;
{Both point to the same address}
if (pTest1 = pTest2) then
Writeln("Both have the same value")
else
Writeln("Both have different values");
endif;
end;
In this version, the same address is assigned to both pointers and then they are compared to one another (be careful with this in practice). In most case, though, you will want to compare the content of the variables.
Solution
{Second possibility (PointerComparison3.pool)}
procedure vMain;
begin
i16Test1 := 12;
i16Test2 := 12;
pTest1 := @i16Test1;
pTest2 := @i16Test2;
{The variables that are referenced have the same value}
if (pTest1^ = pTest2^) then
Writeln("Both have the same value")
else
Writeln("Both have different values");
endif;
end;
During the dereferencing process the values of the variables are compared and not the addresses.
In addition to the typed pointers you also have the possibility to create untyped pointers of the type Pointer. These pointers can point to any type of variables (including other pointers) and are assignment compatible with all other pointer types. However, you first have to do a type cast to dereference a pointer type.
In the following example we will create a pointer of type Int16 (pTest2), and we will assign its address to a pointer of type Pointer (pTest1). As a result we obtain a pointer to a pointer also called a double pointer. In order to put out the value of the pointer of the type Pointer, you only have to write pTest1. If you want to put out its address, write @pTest1. In contrast, you will obtain the address of pTest2 by specifying its name without the address operator.
Example (DoublePointers.pool)
var
i16Test: Int16; {Int16 Variable}
pTest2: ^Int16; {Int16 Pointer}
pTest1: Pointer; {Pointer of the type Pointer}
{Main program}
procedure vMain;
begin
i16Test := 23;
pTest2 := @i16Test; {Assign the address of i16Test}
pTest1 := @pTest2; {Assign the address of pTest2}
Writeln(pTest2, " = ", tpPtr(pTest1)^); {Print the address of i16Test
twice}
end;

Figure 19: Double pointers
We will deal with additional examples on double pointers in the section on linked lists. We will deal with the use of untyped pointers in further detail in the next section.
With these commands, you have already become familiar with the basic possibilities for working with pointers:

Table 9: Pointer syntax
Based on this knowledge we can proceed to the use of pointers. Before you work on the next section, you should have most definitely understood the basic priciples of pointers.
The variables that you have studied up until now occupy the memory location statically, in other words the necessary memory is reserved during the start of the program or the subroutine and is not deallocated until the end of the program.
The advantage of this method is that programming is made easy. The disadvantage is that the memory is always occupied during the entire run time of the program, regardless whether it is used or not. Since memory is a limited resource, dynamic memory management offers an elegant way to allocate memory only when it is actually used and then deallocates it again. However, the programmer must explicitly allocate and deallocate the memory.
Imagine for instance you had written a program to manage the personal data of your company's staff members. You use the staff member structure to store an individual staff member data in memory (see the appropriate section). You could once again use an array in order to store all your company's staff members. This will cause a big problem. At the time the program is created, it is not usually known, how many data records will have to be entered. It is hard to predict, whether the company will grow to become a small firm with 50 staff members or possibly a future global corporation with 100.000 staff members. Of course, you can create an array with 100.000 elements. Apart from the fact that even then you can't be sure whether 100.001 elements will be needed at some point in time you will waste an unnecessary amount of memory. The alternative is to reserve or allocate the required memory in relationship to the current demand only during run time, in other words dynamically.
Up until now you have declared pointers and then assigned variables to them that already existed in memory. However, no memory block is assigned to the pointer during declaration, in other words it points to nil. If you try to assign a value (e.g. an integer) to the dereferenced pointer during this status, then the program will abort with a run time error.

Figure 20: Pointer after declaration
First, we have to dynamically allocate memory of the appropriate data type. In order to do this we need the New command, which allocates memory during run time. New assigns the address of the reserved memory to the pointer if successful or nil otherwise.

Figure 21: Allocation of memory using New
The size of the allocated memory depends on the type of the pointer. An Int16 pointer for instance reserves a memory block of 2 bytes using the New command.
A value can now be directly assigned to the memory.
Example (DynPointer.pool)
private
var
pi16Test : ^Int16; {Declaring a pointer of type
Int16}
{Main program }
procedure vMain;
begin
New (pi16Test); {Reserving the memory}
pi16Test^ := 1024; {Assigning the value}
Writeln("Output: ",pi16Test^); {Output of the value}
Dispose (pi16Test); {Deallocating the memory}
end;
To allocate memory using an untyped pointer, you have to explicitly specify the desired size. In the following example, memory for an Int32 variable is reserved using New. We use the SizeOf function to calculate the required memory size. Alternatively it is also possible to specify the required memory size directly (in bytes).
The assignment copies the content of variable i32Value to the allocated memory that the untyped pointer points to. In order to make this possible, pTest has to be casted to type Int32 and then dereferenced. This shows that, here too, POOL consequently applies a strict type checking for the benefit of the user and the quality of the program. Finally, the value is put out with the help of the same conversion and the memory is deallocated again. The standard functions SizeOf and MemMove will be treated in detail in the third part of this tutorial.
Example (UntypedPointer.pool)
module TEST;
type
tpInt32 = ^Int32; {Defining an pointer
of type Int32 }
private
var
pTest: Pointer; {Declaring a
untyped pointer}
i32Value: Int32; {Declaring a variable}
{Main program }
procedure vMain;
begin
i32Value := 100; {Assign a value to the
variable i32Value}
New (pTest,SizeOf(Int32)); {Allocate memory, to which the
untyped pointer pTest points
to}
tpInt32(pTest)^ := i32Value; {Assign the value of the
variable i32Value to the
memory, where pTest points to}
Writeln("Output: ",tpInt32(pTest)^); {Output of the value 100}
Dispose (pTest); {Deallocating the memory}
end;
begin
end.
If a dynamically allocated memory is no longer needed, it has to be deallocated again during runtime using the Dispose key word. After the memory is deallocated, it is available again for future memory allocations. The actual pointer is set to nil pointer again and must not be used again (except if memory was allocated to the pointer again). Please see the above example on how the Dispose statement can be applied.
Important notice
Every New statement requires a Dispose statement! Thus, you have to ensure that all dynamically allocated memory blocks are deallocated again at least at the end of the program.
Figure 24: Pointer after Dispose
Important
Memory that is no longer needed always has to be deallocated!
Dynamic memory management offers you a tool that you can use during the entire runtime of the program in order to specify how many staff members are to be stored. Besides, you can remove a staff member, who leaves the company, from memory without problem. However, our problem has not been solved entirely. Since arrays are not possible due to static data reservation, you will need a similar structure to manage the data. In this structure, it should be possible to store staff members alphabetically, remove old data and add new data. Linked lists are used to implement this type of structure. The next chapter will explain how they work.
Exercise:
Write a function that reserves memory for a dynamic array with 10 elements of the String type. Assign a value to one element and put out this value. Deallocate the memory again at the end of the function.
Note for C Programmers
Since String is a special dynamic data type in POOL, the users do not have to worry about the required memory size for the String type.
Example (DynArray1.pool)
module TEST;
private
const
nNumOfElem = 10;
var
apcsTest: array[1.. nNumOfElem] of ^CharString;
i8Count: Int8;
{Main program}
procedure vMain;
begin
{Allocate memory for the array}
for i8Count := 1 to nNumOfElem do
New(apcsTest[i8Count]);
endfor;
apcsTest[3]^ := "Teststring";
Writeln(apcsTest[3]^);
{Deallocate the memory}
for i8Count := 1 to nNumOfElem do
Dispose(apcsTest[i8Count]);
endfor;
end;
begin
end.
As you have already learnt in the sections on functions and procedures, passing parameters is generally done via call by value. Reminder: Call by value means that only the value of the variable is passed and not the actual variable. It is not possible to change the value of the passed variable in a subroutine. Besides, a call by value causes the run time characteristics to deteriorate in particular with large amounts of data due to copying.
If you want to directly access data of the calling program in a subroutine, then this is possible by passing a pointer (call by reference). By passing the address you can directly access the data in the memory. In the following example you can track what kinds of effect this access has.
Example (PassingPointers.pool)
module TEST;
public
type
tpInt16 = ^Int16; {Defining an pointer of type
Int32}
{Public function declaration}
function boSetValue(i16TestPar:Int16; pi16TestPar:tpInt16): Boolean;
private
{Definition of the function}
function boSetValue(i16TestPar:Int16; pi16TestPar:tpInt16):Boolean;
begin
i16TestPar := i16TestPar * 2; {Modify the local variable}
pi16TestPar^ := pi16TestPar^ * 2; {Modify the variable pi16Test2 which
is passed by referece}
{Output of the values of the help variable}
Writeln("Value of the first help variable in the function: ",i16TestPar);
Writeln("Value of the second help variable in the function: ",
pi16TestPar^);
boSetValue := true;
end;
{Main program}
procedure vMain;
{Declaration of local variables}
var
i16Test1: Int16;
i16Test2: Int16;
boOk: Boolean;
begin
{Initialize the variables}
i16Test1 := 4;
i16Test2 := 4;
{Output of the values before the function call}
Writeln("Value of the first variable before the function call: ",
i16Test1);
Writeln("Value of the second variable before the function call: ",
i16Test2);
{Call of the function – since boOk is not used, it would also be possible
to use a procedure}
boOk := boSetValue(i16Test1,@i16Test2);
{Output of the values after the function call}
Writeln("Value of the first variable after the function call: ",i16Test1);
Writeln("Value of the second variable after the function call: ",i16Test2);
end;
begin
end.
Test the example in the commander and observe the output on the screen. As you can see, the value of the second variable i16Test2 is really changed from within the function.
Please observe that the address of the variable is passed instead of its value.
Call by reference is not allowed with Constants.
You can also pass untyped pointers as parameters. When doing so, please observe the same as with the use of untyped pointers, in other words a type cast is necessary.
The disadvantage when passing pointers is the complicated syntax compared to the use of "normal" variables. C's original flaw was eliminated in C++ and thus passing variables as reference were introduced. Passing variables via reference is obviously a basic function in POOL, simply due to its similarity to Pascal.
A reference is a synonym for a variable and accesses the same address as the passed variable. Basically, we are talking about a pointer again, except that the syntax to access the variable is easier, i.e. just like a normal variable. Since the address operator is not used when the variable is passed to the function, the caller of the function does not realize that he is passing a reference instead of a copy of the value. This is the risk of references. Thus, references should only be used where it is required. In any case, functions that are using references have to be well documented.
The referenced variable can be accessed in the subroutine without using the dereferencing operator, since it refers to the same memory content.
The key word var is used in the function declaration to pass a variable as reference. var must precede the parameter declaration. The various effects of the call by value and the call as reference can be observed in the following program. Please compare this example to the previous one to understand the different syntax when using pointers respectively references.
Example (PassingReferences.pool)
module TEST;
{Public function declaration}
function boSetValue(i16Test1Par:Int16; var i16Test2Par:Int16): Boolean;
private
{Definition of the function}
function boSetValue(i16Test1Par:Int16; var i16Test2Par:Int16): Boolean;
begin
i16Test1Par := i16Test1Par * 2; {Value change of the
local variables}
i16Test2Par := i16Test2Par * 2; {Value change of the
referenced
variables (original)
pi16Test2}
{Output of the values of the help variable}
Writeln("Value of the first help variable in the function: ",
i16Test1Par);
Writeln("Value of the second help variable in the function: ",
i16Test2Par);
boSetValue := true;
end;
{Main program }
procedure vMain;
{Declaration of local variables}
var
i16Test1: Int16;
i16Test2: Int16;
boOk: Boolean;
begin
{Initialisation of the variables}
i16Test1 := 4;
i16Test2 := 4;
{Output of the values before the function call}
Writeln("Value of the first variable before the function call: ",i16Test1);
Writeln("Value of the second variable before the function call: ",
i16Test2);
{Call of the function – since boOk is not used, it would also be possible
to use a procedure}
boOk := boSetValue(i16Test1,i16Test2);
{Output of the values after the function call}
Writeln("Value of the first variable after the function call: ",i16Test1);
Writeln("Value of the second variable after the function call: ",i16Test2);
end;
begin
end.
Please test this example in the commander as well and observe the output on the screen. As you can see, the value of the second variable i16Test2 is changed from within the function in this example as well.
Please note in particular the call of the function when doing so. Since the user merely passes the variable without the address operator, he is unable to realize that he passes a reference and thus allows the manipulation of the variable in the function.
It is not possible to pass constants as a reference.
As with pointers, it is permitted to pass untyped parameters as reference. In this case a type cast is necessary.
The next section on single linked lists also shows how to pass pointers as reference.
There are two approaches that can be used to implement linked lists. First, we are going to introduce the slightly more difficult recursive linking. Next, we will take a look at the easier non-recursive approach.
Since some important relationships will be explained in this section, you should not skip it under any circumstances.
Warning
Before you go on with the linked lists, it is extremely important that you have understood dynamic memory management and how to work with references.
Even if you don't need linked lists for your actual work, you should think through the example and try to understand each line of the code. This is not easy of course, but once you have understood the procedures involved in creating and reading single linked lists, you will no longer have to worry about the practical application of pointers and references.
Linked lists are dynamically created variables or structures that are linked via pointers. Each list element contains the address of the next element and its own content. The first pointer is called root and is always used to access the list. It has to be created first, preferably statically, and shall not be deleted or moved since it is the actual attachment element of the linked list. In order to detect the end of the list, the nil pointer is used as value ot the last element's pointer.

Figure 25: Single linked list
Since each list element consists of a content and the address of the next element, it is obvious to use a Record or a structure. We will limit our explanation to a structure that includes an integer variable in addition to the address. It can be extended anytime so you could use it to administer the familiar staff member structure.
First, let's create the necessary structure.
Example (RecursiveLinkedList.pool)
module TEST;
public
type
tstListElement = record {Create the structure list element}
pstNextListElement: ^tstListElement;{Pointer to the next list element}
i16ListValue: Int16; {List content}
end;
private
var
pstRoot: ^tstListElement; {Pointer to the current element
of the list}
{Main program }
procedure vMain;
begin
pstRoot := nil; {Assign the nil pointer to the root}
...
The code lines above declare the structure of the list elements and the root pointer.
Now we need a procedure to add a new element to the list and a procedure to put out the list.
We have to make a distinction between a recursive call and an external call, for instance from vMain. During the external call, the first list element (the root) and the content for the new list element is passed. If there is more than one list element, recursive calls traverse list down to the last element passing a reference to the current list element of type ^tstListElement and the desired content. The new list element is added when the last existing list element is found. The same distinction between external and recursive call has to be made with the list's output procedure. However, the content is not passed to the procedure. In the following you will see the procedure declarations and their implementation. A pstRoot pointer has to be created, in which the address of the first element is stored, and another pointer for the new element. As you can see in this example pointers can also be passed as reference. In other words, the pointer access occurs in the procedure analog to the pointer access in the calling program. Please remember that a reference is basically a synonym for a variable. This also applies to pointers.
Example
{Public procedure declaration}
procedure vAddToList (var pstElement: ^tstListElement; i16ListValue:Int16);
procedure vOutputList(var pstElement: ^tstListElement);
{Private variables}
private
var
pstRoot: ^tstListElement; {Pointer to the first
element of the list}
pstNewElement: ^tstListElement; {Pointer to the new element}
{Add the list element procedure}
procedure vAddToList (var pstElement: ^tstListElement; i16ListValue:Int16);
begin
if pstElement = nil then {If the end of the list
has been reached,}
New(pstNewElement); {Create a new list element}
pstNewElement^.pstNextListElement := nil; {next address is the nil
pointer (end of list)}
pstNewElement^.i16ListValue := i16ListValue; {Allocation of a content}
pstElement := pstNewElement; {The last element receives
the address of the new
element}
else {If the end of the list
has not yet been reached}
vAddToList(pstElement^.pstNextListElement, i16ListValue);{Go to the
next element}
endif;
end;
Explanation
A reference to the root element is passed when the procedure is called externally (see vMain further below). If this is the first time the procedure is called, only the root element exists and pstNextElement is nil. Thus, the condition of the if statement is met and a new list element is created. Nil is assigned to the pointer of the new element to mark it as the last element of the list. Next the element value is set and the new element's address is assigned to the root via the reference variable (pstElement).
Fig. 26 shows how the single linked list looks like after this call:

Figure 26: Add the first element
When the procedure is called again, the condition of the if statement is no longer met. The root element points now to the next list element and not to nil. As result the else branch is executed. The else branch calls the addToList procedure recursively passing on the content of the new element and a reference to the next element (Element1 in Fig. 26). Since Element1 point the the end of the list (nil pointer), the condition is met now and a new element is created. The new element's pointer to the successor is set to nil and the content is stored. Finally the address of the new element is assigned to pstElement thus adding the new element to the list. Additional calls to add list elements follow this schema.
Please note that the parameter pstElement references the currently processed element (Element1 in this case) which is the last element in the list, since its pointer pstNextElement is nil.
The outputList procedure that is listed in the following gets the root element as argument. The procedure checks whether the passed parameter is the last element of the list (nil pointer). The value of the current element is put out if the end of the list has not yet been reached, and the function calls itself recursively.
Example
{Procedure to put out the list}
procedure vOutputList(var pstElement: ^tstListElement);
begin
if pstElement <> nil then {If the end of the list has
not yet been reached}
Writeln(pstElement^.i16ListValue); {Put out the content of the
list element}
vOutputList(pstElement^.pstNextListElement);{Go to the next element}
endif;
end;
The procedure vAddToList is called in the main program for each new list element. Afterwards the output is done via the vOutputList procedure call. The root element gets no value assigned. It is only used to access the list.
Example
{Main program}
procedure vMain;
begin
pstRoot := nil; {Assign the nil pointer to the root}
vAddToList(pstRoot,1); {Attachment of a list element with the content 1}
vAddToList(pstRoot,2); {Attachment of a list element with the content 2}
vAddToList(pstRoot,3); {Attachment of a list element with the content 3}
vAddToList(pstRoot,4); {Attachment of a list element with the content 4}
vAddToList(pstRoot,5); {Attachment of a list element with the content 5}
vOutputList(pstRoot); {Output of the list}
{At this point the complete list would usually have to be deleted and the
memory that was reserved using new would have to be deallocated again}
end;
The following exercises should be used to improve the knowledge of the presented subject. We highly recommend that you solve it independently. If you don't have that much time, you should at least remember at this point, which other functions are available for working with lists. If required the sample solution can be adapted to your own project.
Searching data in linked lists
Exercise:
Add a function to search data contents to the list. The number of hits should be stored in a variable.
Note
Pass the variable to store the number of hits as reference.
Solution
{Procedure search data}
procedure vSearchData(var pstElement: ^tstListElement;
i16SearchValue: Int16;
var pi16NumOfHits : Int16);
begin
if pstElement <> nil then {If the end of the list has not
yet been reached}
{If the value is equal to the value that is searched}
if pstElement^.i16ListValue = i16SearchValue then
pi16NumOfHits := pi16NumOfHits + 1; {Number of hits}
endif;
{Go to the next list element}
vSearchData(pstElement^.pstNextListElement,i16SearchValue,
pi16NumOfHits);
endif;
end;
Comment
The variable that is used to calculate the hits has to be declared within the scope of the calling function. When the function is called, the root, the value that is to be searched, and the counting variable are passed as parameters. The output of the hits can then be done in the calling function after the procedure has been processed.
This procedure can be used for all kinds of searches by slightly changing the source code. One example would be the search for a staff member via the distinctive personnel number and simply returning a pointer to the list element. (implementation as a function).
Deleting the list
Exercise
Next, write a procedure that can be used to delete the entire list.
Note
You can find additional advice on working with linked lists in the Internet. It would be a good exercise to look for Pascal code that delets or adds element to a linked list for instance in text books and to modify the code so that it can be used in your actual project.
This is a usual approch. Nevertheless, the correctness of the program will have to be tested thoroughly.
Solution:
{Delete procedure list}
procedure vDeleteList (var pstStart: ^tstListElement);
var
pstElement: ^tstListElement;
begin
if pstStart <> nil then {If the end of the list
has not yet been reached}
pstElement := pstStart; {Un-chain the first
list element}
pstStart := pstStart^.pstNextListElement;
Dispose(pstElement); {Deallocate the
list element}
vDeleteList(pstStart); {Go to the next
element}
endif;
end;
The root element is simply passed to the function.
To work with linked lists you can additionally write a function that is used to insert list elements. Here again, the Internet can provide good examples.
Important
If a list is no longer needed, it has to be completely deleted and the memory has to be deallocated again. You can use the function above to do this.
We want to mention a big disadvantage of the recursive function call:
A stack is required for each function call. This may lead to problems with large lists, if the stack is too small. However, these types of problems are usually solved by using appropriately linked tree structures instead of linear lists.
Besides, recursive function calls have bad perfomace issues.
Since you are now familiar with the recursive implementation of linked lists, the non recursive version should not be any problem for you. Just look at the following example and experiment a little bit. Since the program code is self-explanatory, we will not provide a detailed description.
Example (SingleLinkedList.pool)
module TEST;
public
type
pstListElement =^tstListElement;
tstListElement = record
i32Value: Int32;
i32ElemNumber: Int32;
pstNext: pstListElement;
end;
procedure vAddListElem (pstRoot:pstListElement; i32ValuePar:Int32);
procedure vInsertListElem (pstRoot:pstListElement; i32ElemNumberPar:Int32;
i32ValuePar:Int32);
procedure vVDeletListElem (pstRoot:pstListElement; i32ElemNumberPar:Int32);
procedure vDeletList (var pstRoot:pstListElement);
procedure vOutputList (pstRoot:pstListElement);
function vGetListElem (pstRoot:pstListElement;
i32ElemNumberPar:Int32): Int32;
private
// Add element to the list
procedure vAddListElem (pstRoot:pstListElement; i32ValuePar:Int32);
var
pstNextElem: pstListElement;
pstNewElem: pstListElement;
pstLastElem: pstListElement;
begin
if pstRoot = nil then
Writeln("No list available");
return;
endif;
pstLastElem := pstRoot;
pstNextElem := pstRoot^.pstNext;
while pstNextElem <> nil do {Go to the end of the list}
pstLastElem := pstNextElem;
pstNextElem := pstNextElem^.pstNext;
endwhile;
{Add list element}
New(pstNewElem);
if pstNewElem=nil then
Writeln("Out of Memory");
return;
endif;
pstLastElem^.pstNext := pstNewElem;
pstNewElem^.i32ElemNumber := pstLastElem^.i32ElemNumber + 1;
pstNewElem^.pstNext := nil;
pstNewElem^.i32Value := i32ValuePar;
end;
// Insert element into the list
procedure vInsertListElem (pstRoot:pstListElement;
i32ElemNumberPar:Int32;
i32ValuePar:Int32);
var
pstNextElem: pstListElement; // Next element
pstNewElem: pstListElement; // Element that is to be added
pstLastElem: pstListElement; // Last element
begin
if pstRoot = nil then
Writeln("No list available");return;
endif;
pstLastElem := pstRoot; // Last element equals root
pstNextElem := pstRoot^.pstNext;
while pstNextElem <> nil do // If the end of the list
// has not yet been reached
// Index found
if pstNextElem^.i32ElemNumber = i32ElemNumberPar then
New(pstNewElem);
if pstNewElem=nil then // In case of error
Writeln("Out of memory (pNew = nil) ");
return;
endif;
pstLastElem^.pstNext := pstNewElem; // Last element points to
// new element
pstNewElem^.pstNext := pstNextElem;// New element points to
// previous element at index
pstNewElem^.i32ElemNumber := i32ElemNumberPar;
pstNewElem^.i32Value := i32ValuePar;// Assign value
pstNextElem := pstNewElem^.pstNext;
while pstNextElem <> nil do // Increase index of the
// next elements
pstNextElem^.i32ElemNumber := pstNextElem^.i32ElemNumber + 1;
pstNextElem := pstNextElem^.pstNext; // Next element
endwhile;
return; // Finish the procedure
else // Index has not been
// reached yet
pstLastElem := pstNextElem;
pstNextElem := pstNextElem^.pstNext;
endif
endwhile; // Selected index is too high
Writeln("Invalid index - Value is added at the end of the list.");
New(pstNewElem);
if pstNewElem=nil then // In case of error
Writeln("Out of memory (pNew = nil) ");
return;
endif;
pstLastElem^.pstNext := pstNewElem;
pstNewElem^.pstNext := nil;
pstNewElem^.i32ElemNumber := pstLastElem^.i32ElemNumber + 1;
pstNewElem^.i32Value := i32ValuePar;
end;
// Delete list element - by specifying the number
procedure vVDeletListElem (pstRoot:pstListElement;
i32ElemNumberPar:Int32);
var
pstNextElem: pstListElement; // Next element
pstLastElem: pstListElement; // Last element
begin
if pstRoot = nil then
Writeln("No list available");
return;
endif;
pstLastElem := pstRoot; // Last element equals root
pstNextElem := pstRoot^.pstNext;
while pstNextElem <> nil do // If the end of the list
// has not yet been reached
// Index found
if pstNextElem^.i32ElemNumber = i32ElemNumberPar then
// Last element points to the element before the element that
// is to be deleted
pstLastElem^.pstNext := pstNextElem^.pstNext;
Dispose(pstNextElem); // Deallocation of the memory
pstNextElem := pstLastElem^.pstNext;
while pstNextElem <> nil do // Decrementing the index
// of the next elements
pstNextElem^.i32ElemNumber := pstNextElem^.i32ElemNumber - 1;
pstNextElem := pstNextElem^.pstNext; // Next element
endwhile;
return; // End the program
else // Index has not yet
// been reached
pstLastElem := pstNextElem;
pstNextElem := pstNextElem^.pstNext;
endif
endwhile // Invalid index passed
Writeln("Invalid index");
end;
// Delete list element - by specifying the value
procedure deletValue(pstRoot:pstListElement;i32ValuePar:Int32);
var
pstNextElem: pstListElement; // Next element
pstLastElem: pstListElement; // Last element
begin
if pstRoot = nil then
Writeln("No list available");
return;
endif;
pstLastElem := pstRoot; // Last element equals root
pstNextElem := pstRoot^.pstNext;
while pstNextElem <> nil do // If the end of the list
// has not yet been reached
if pstNextElem^.i32Value = i32ValuePar then // Value found
// Last element points to the element after the element that
// is to be deleted
pstLastElem^.pstNext := pstNextElem^.pstNext;
Dispose(pstNextElem); // Deallocation of the memory
pstNextElem := pstLastElem^.pstNext;
// Decrementing the index of the next elements
while pstNextElem <> nil do
pstNextElem^.i32ElemNumber := pstNextElem^.i32ElemNumber - 1;
pstNextElem := pstNextElem^.pstNext; // Next element
endwhile;
return; // Finish the procedure
else // Index has not been reached
// yet
pstLastElem := pstNextElem;
pstNextElem := pstNextElem^.pstNext;
endif
endwhile // Invalid index
Writeln("Invalid selection");
end;
// Delete entire list
procedure vDeletList (var pstRoot:pstListElement);
var
pstElem: pstListElement;
pstNextElem: pstListElement;
begin
if pstRoot = nil then
Writeln("No list available");
return;
endif;
pstNextElem := pstRoot^.pstNext;
while pstNextElem <> nil do
pstElem := pstNextElem;
pstNextElem := pstNextElem^.pstNext;
Dispose(pstElem);
endwhile;
pstRoot^.pstNext := nil;
Dispose(pstRoot);
end;
// Put out list element
function vGetListElem (pstRoot:pstListElement;
i32ElemNumberPar:Int32):Int32;
var
pstNextElem: pstListElement; // Next element
begin
if pstRoot = nil then
Writeln("No list available");
return;
endif;
pstNextElem := pstRoot^.pstNext;
while pstNextElem <> nil do
if pstNextElem^.i32ElemNumber = i32ElemNumberPar then
vGetListElem := pstNextElem^.i32Value; // Return of the value
return; // Exit the function
else // Index has not been reached
// yet
pstNextElem := pstNextElem^.pstNext;
endif
endwhile; // Selected index is too high
Writeln("Invalid index");
end;
// Put out the entire list
procedure vOutputList (pstRoot:pstListElement);
var
pstNextElem: pstListElement; // Next element
begin
if pstRoot = nil then
Writeln("No list available");
return;
endif;
pstNextElem := pstRoot^.pstNext;
while pstNextElem <> nil do
Writeln("List element:",pstNextElem^.i32ElemNumber,".Value:",
pstNextElem^.i32Value);
pstNextElem := pstNextElem^.pstNext;
endwhile;
end;
// Create new list
function boNewList(var pstRoot:pstListElement):Boolean;ifr;
begin
New(pstRoot);
if pstRoot = nil then // In case of error
boNewList := false;
else
pstRoot^.pstNext := nil;
boNewList := true;
endif
end;
// Main program (open for your own tests)
procedure vMain;
var
pstRoot: pstListElement;
begin
boNewList(pstRoot); // Create new list
vAddListElem(pstRoot,1); // Add list element
vAddListElem(pstRoot,111); // Add list element
vOutputList(pstRoot); // Put out list
Writeln("\nInsertElement:");
vInsertListElem(pstRoot,2,11); // Insert element
vOutputList(pstRoot); // Put out list
Writeln("\nDeletElement:");
vVDeletListElem(pstRoot,2); // Delete element
vOutputList(pstRoot); // Put out list
Writeln("\nDeletElement:"); // Delete element
vVDeletListElem(pstRoot,0);
vOutputList(pstRoot); // Put out list
Writeln("\nDeletValue:");
deletValue(pstRoot,111); // Delete element
vOutputList(pstRoot); // Put out list
Writeln("\nGetValue:");
Writeln("Listvalue :",vGetListElem(pstRoot,1));
vDeletList(pstRoot); // Delete list
Writeln("\nVDeletList:");
vOutputList(pstRoot);
Dispose(pstRoot); // Delete root
end;
begin
end.
To complete the picture we want to mention double linked lists.
With double linked lists, the elements are linked with pointers to the previous
element and the subsequent element. During this introduction we will not go
into further details.
If you are interested in this topic please refer to the Internet.
There are a number of commands that do not belong to the POOL language itself, instead they are used to control the compiler. A distinction is made between three classes of compiler commands; they will be described in further detail in the following sections.
Switches are used to set an operating mode without passing parameters.
For a description of the operating principle of the individual switches please see the BSK POOL Help menu, revision 2.03.08:
$cbe <+|->
The switch determines whether logical expressions are to be fully evaluated. In contrast there is the so-called short-circuit evaluation, which stops as soon as the result of the expression can no longer be changed with the help of another evaluation. The default setting for this parameter is {$cbe-}.
$coct <+|->
This switch specifies whether the compiler interprets integers with leading zeros as an octal value {$coct+} or rejects them as incorrect {$coct-}. The default setting is {$coct-}.
Comment: We generally advise you not to use coct. POOL offers a distinctive identification of octal numbers through the use of the suffixes o of O and q or Q (Q is used because it looks like O, but it is not easily confused with 0 (zero)).
$zstr <+|->
This switch specifies whether the compiler admits allocations of strings to variables of the type array[0..n] of Char {$zstr+} or whether it rejects them as incorrect {$zstr-}. The default setting is {$zstr-}.
$ifr <+|->
This switch specifies whether the compiler permits the use of functions as procedures {$ifr+} or whether it rejects them as incorrect {$ifr-}. The default setting is {$ifr-}. The name is short for 'Ignore Function Result'. This switch can also be used as a Function-Modifier ifr.
Comment
In order to prevent the improper use of functions such as ignoring returned error conditions, the compiler switch {$ifr+} should not be used as a matter of principle.
Reasoning
1. There are not many functions in POOL, in contrast to C, for which it would make sense that the result is ignored.
2. Wherever they exist (e.g., WriteStr etc.), these functions are already marked with the Procedure-Modifier ifr.
3. In individual cases the function can be explicitly used via the type cast "procedure(..)", which also indicates that the function result was intentionally ignored.
Files to include can be specified as parameters.
A typical application is to include function libraries.
The syntax looks as follows:
Example
{$i LibaryFile}
The content of the file is included at this point in the executable program and can be used as usual in the course of the subsequent program. How libraries are included will be explained in further detail in the second part of the tutorial.
The following switches are available to reserve stack memory.
Example
{$stklen length}
The parameter length is used to specify the size of the stack that is needed by the module. If the specified memory size is exceeded, the program is aborted during runtime. This switch was only listed to complete the picture and is usually not needed.
Conditional compilation can be used to specify which program parts are to be compiled and which are not. Parts that are not compiled will not appear in the executable program, and as a result the program becomes smaller.
To use conditional compilation, the existence of certain symbols is checked and the appropriate program section is compiled or not compiled depending on the result.
The symbols are defined by using the following commands:
Example
$define VERSION1 {Symbol available}
$undef VERSION1 {Symbol no longer available}
The symbol test occurs in special if statements, and the program part behind the request is compiled depending on the if statement.
Example
$ifdef VERSION1 {If symbol available}
$ifndef VERSION1 {If symbol not available}
$else {else branch}
$endif {End of the conditional compilation}
Using conditional compilation it is possible to administer several versions of a program with a single source code file. The desired version will then be selected via the symbol variable. Counters of various sizes will be declared in the following example depending on the version:
Example
$define VERSION1 {Version 1 is to be generated}
$undef VERSION2 {Not version 2}
$undef VERSION3 {Neither version 3}
$ifdef VERSION1 {Create VERSION1}
var
xiCounter: Int8;
$else
$ifdef VERSION2 {Create VERSION2}
var
xiCounter: Int16;
$else {Create VERSION3}
var
xiCounter: Int32;
$endif
$endif {End of the conditional compilation}
{From this point on everything will be compiled without conditions}
Standard symbols
Some symbols are pre-defined. Their list and description is based on the BSK-POOL help text revision 2.03.08:
BigEndian
Indicates, whether the compiler runs on a computer with this byte arrangement (e.g., Motorola 68000 CPU).
DOS
Indicates, whether the compiler runs on a DOS computer.
LittleEndian
Indicates, whether the compiler runs on a computer with this byte arrangement (e.g., Intel 80x86 CPU).
MiddleEndian
Defines, whether the compiler runs on a computer with this byte arrangement (e.g., DEC Alpha CPU).
POOL
Always defined by the POOL compiler.
UNIX
Defines, whether the compiler runs on a UNIX computer.
After you have worked through this tutorial, you have the necessary knowledge to successfully write your own programs in POOL. Since the first part only explains the basics of the programming language, without going into the details of additional concepts such as object oriented programming (OOP) and reuse of source code, we recommend the second part of the tutorial. It describes the important OOP concept and its implementation in POOL in great detail, and your knowledge is deepened with the help of examples and exercises.
The third part of the tutorials provides a description of the POOL standard libraries and can be used as a reference. These standard libraries include functions that can be used to work with strings and files as well as, among others, mathematical functions.
Comments
{Comment}
// Comment
Reserved names
absolute, and, array, begin, BCSTR, Boolean, breakfor, breakrepeat, breakwhile, Byte, ByteString, case, Char, CharString, const, constructor, contfor, continue, contrepeat, contwhile, destructor, div, do, downto, DWord, else, elseif, end, endcase, endfor, endif, endwhile, endwith, exit, external, false, for, forward, from, function, goto, if, IFR, import, in, inherited, Int8, Int16, Int32, Int64, label, loop, module, mod, nil, not, object, of, or, packed, Pointer, private, procedure, program, public, Real32, Real64, QWord, record, repeat, return, set, shl, shr, signed, static, String, then, to, true, type, UChar, UCharString, unsigned, until, var, variant, virtual, WChar, while, WideString, with, withopt, Word, WordString, xor
Variables

Table 10: Integer variables

Table 11: Real variables

Table 12: Other variable types
Type definitions
Key word type
Output
Command: Writeln("Variable: ",i16Value);
Complex data types

Table 13: Complex data types
Unary operators

Table 14: Unary operators
Arithmetic operators

Table 15: Arithmetic operators
Comparative operators
Table 16: Comparative operators
Logical operators

Table 17: Logical operators
Operator precedence
Table 18: Operator precedence
Control structures

Table 19: Control structures
Program structure
Table 20: Program structure
Other key words

Table 21: Other key words
Pointer syntax

Table 21: Pointer syntax
Algorithms
An algorithm specifies a general method for the solution to a problem. Typical examples for algorithms can be found in cook books.
Example
· Add a tee spoon of salt.
· Next, stir for 5 minutes.
· Let the sauce simmer for half an hour.
An algorithm consists of a number of operations that are necessary to reach a result, in our case how to make a sauce. These steps can then be executed in a program.
The program specifies exactly which individual steps have to be carried out.
Example
· Take a tee spoon from the left drawer.
· Completely fill the spoon with salt from the cup in front of you.
· Pour the salt into the pot in front of you.
As you can see, each algorithm step is composed of a number of statements. These statements are described in great detail in a program.
Statement
Statements are individual steps of a program in a programming language. A statement in a higher programming language usually consists of several statements in assembler or machine language. Thus, for the statement a + b both variable a and variable b have to be obtained from the memory, before the addition can be executed.
Executable Program
A program that is available in machine code and that can be executed by the computer.
Bit
A bit can only have the values 1 and 0. It is the smallest storage unit of a computer. The use of the binary logic is a consequence of the technical realization of the computer, which can only work with the two conditions true and false or the voltage values high and low.
Byte
8 bits are combined into one byte. A byte can be used to represent 28 = 256 values.
Compiler
Is used to translate program codes from higher programming languages into executable machine code. After the compilation, the code is available in the form of object files. If several object files are used in a program, they have to be connected via the linker and converted into an executable program.
Note: The POOL compiler creates pli files that do not need to be linked to an executable.
Debugger
Important tool for executing a program line thus allowing to inpsect the values of variables during the program executes. This is a great tool to find logical errors.
Note: In contrast to syntax errors, logical errors such as an incorrectly worded condition (e.g., (a > b) instead of (a >= b)) can not be detected by the compiler.
Editor
In the simplest case, an editor is a simple text program, in which the program lines are typed in. The TextPad program by Helios Software Solutions was used to create the program examples. However, any other editor can be used.
Proficient editors mark different statements such as if statements in color (syntax highlighting or syntax coloring). This results in an improved legibility of the program code and facilitates error detection.
IDE (Integrated Development Environment)
An integrated development environment (IDE) combines editor, compiler, linker, and debugger in a development environment.
Libraries
General functions such as functions for string handling are usually combined in so-called libraries (function libraries). These functions can then be used through the import of a library into the project. Separate libraries can be created for frequently needed functions.
Runtime
The actual execution of a program on the computer is called runtime.
Linker
The task of the linker is to combine object files (see compiler) into an executable program.
Note: POOL does not have a linker. The tasks typically done by a linker is performed by POOL's runtime environment (the P-code Interpreter PI.exe)
Programming languages
· Machine code
Each computer has a language that it can directly turn into command signals. The machine code type is specified through the configuration of the computer and thus it cannot be transferred to other computer types. Since machine code consists of numerically expressed commands, it really is illegible for humans.
· Assembler code
Since it is almost impossible for humans to write programs in machine code, assembler languages were introduced, in which the individual control command numbers are replaced by easy to remember abbreviations (e.g., add for addition). Besides, memory areas can be symbolically addressed in assembler. Assembler code depends heavily on the processor and programs written in assembler code are expensive, as are machine code programs.
· Higher Programming Languages
To make programming easier and to be able to execute programs on different computers, higher programming languages were developed.
They consist of easy to learn statements and often consist of some machine code statements per programming language statement. In order to be able to execute a higher programming language program, the compiler first has to compile it into executable machine code.
The POOL programming language that you are studying in this tutorial is a modern version of higher programming languages. Its very special advantage lies in the fact that the language does not contain any machine-dependent language parts.
Programs
see algorithms
Prefix
A combination of characters which precede a variable or a structure thus providing information of the variables data type. A 16 bit integer variable for instance contains, according to POOL nomenclature, the prefix i16, a Boolean variable the prefix bo.
Preprocessor
Before the program is actually compiled, the preprocessor processes the source code e.g. removes the comments.
Interface
In general, an interface is the area that is used to exchange data and statements between different parties (e.g. modules) based on a specified procedure (protocol). When the interface is specified, the exact input and output of functions and procedures has to be specified.
Script language
A script (a text file containing instructions) is not compiled instead the script is parsed during runtime by an interpreter translated into machine code and executed.
Semantics
Semantics is the meaning of a statement.
Source code
Is a text file that consists of a sequence of statements which make up a program. The source code files are the input files for the compiler which creates the executable file.
When the software is delivered to the customer, usually only the executable file is passed on (.exe or .pi in the case of POOL). The source code that contains the know-how remains with the manufacturer. An executable program cannot be reconverted into the source code without loss and it takes a lot of effort.
Syntax
Syntax is the wording of statements in a programming language. The compiler can only compile a statement, if it was correctly spelled. Else, an error message is put out and no executable program is created.

